Comtarsia SignOn Solutions MFA Guide
Table of Contents
- 1. Introduction
- 2. MFA types in detail
- 3. System requirements
- 4. Configuration of the SignOn Proxy
- 5. Configuration on the Logon Client
- 6. Using the Comtarsia User Management Console
- 7. The Comtarsia MFA Cloud Service
- 8. The Comtarsia Authenticator App
- 9. Example configurations
- 9.1 COTP (push notification OTP) as a second factor for Active Directory
- 9.2 FIDO2 for LDAP authentication
- 10. Backup / Migration
- 11. Troubleshooting
Version: 19 July 2025
1. Introduction
The Comtarsia Logon Client supports different Multi-Factor Authentication (MFA) types to be used as a second factor for user authentication. These are:
- TOTP, an industry-standard Time-based OTP, defined in RFC 6238
- HOTP, a standardized counter-based OTP, defined in RFC 4226
- FIDO2 are mostly USB security keys, a standard defined by the FIDO Alliance
- COTP, a Comtarsia developed push notification OTP using the Comtarsia Authenticator App for Android or iOS, compatible with the TOTP standard
Normally, users are just using their passwords to authenticate themselves. Passwords have some well-known drawbacks; some may be easy to guess, an attacker may be able to watch the user entering the password and so on. Therefore, adding a second factor to the authentication process will significantly improve system security.
Before following this guide you must have an already working Logon Client and SignOn Proxy Installation with your backend of choice (LDAP or AD), where users can authenticate using user and password.
Information about the enrolled MFA device and the last logon status needs to be stored for every user. This information can be saved into a user attribute in the LDAP/AD directory or the SignOn Proxy integrated database can be used for this.
If a user must use an MFA device for authentication is controlled using group memberships. Every LDAP/AD group can be extended with an attribute that contains this information, or alternatively, the SignOn Proxy integrated database can be used.
The SignOn Proxy integrated database is the easiest to use, on the other hand, storing the MFA information in the directory has advantages when you have multiple directory servers, as the replication is then handled the standard LDAP/AD way.
2. MFA types in detail
2.1 TOTP and HOTP
TOTP is a time-based OTP standard. HOTP is an index-based OTP standard. As an OTP device, authenticator apps on mobile devices can be used. On enrolment, the Comtarsia Logon Client displays a QR code, which the user subsequently scans with the authenticator app. The Comtarsia Authenticator App for Android and iOS can be used for this, but also other authenticators that support TOTP will work. As an alternative to the authenticator apps, OTP tokens can be used. Such devices cannot be self-enrolled by the user and therefore, they must be assigned to a user before they are handed out. Details of this process are not covered in this guide and can be obtained by request from Comtarsia.
After the enrolment, if the user wants to log in, he enters his username and password as usual, but he adds the OTP generated by the authenticator app after the password.
2.2 FIDO2
FIDO2 is a standard for security keys often with a USB interface. These devices can store credentials for multiple services and applications. To use them, the user must connect them to a USB port and give his consent by pressing a button on the token or sometimes even touching a fingerprint sensor on the token. To enroll, the Logon Client asks the user to connect his token and give his consent.
The FIDO2 standard supports two different types of credentials; resident keys and non-resident keys. With resident keys, the credentials are stored on the token, which is why one token can only support a limited number of different credentials. Using no resident keys, the credentials are not stored in token; instead, they are stored by the SignOn Proxy in the LDAP/AD directory or the integrated dataset. If the users should be able to use the FIDO2 token also for offline-logon, a resident key must be used. This can be configured in the Comtarsia User Management Console, see XXX
2.3 COTP
The Comtarsia developed COTP uses a time-based OTP as a second factor, which is transmitted securely in the background through the use of the Comtarsia Authenticator App and the Comatrsia Cloud Service.
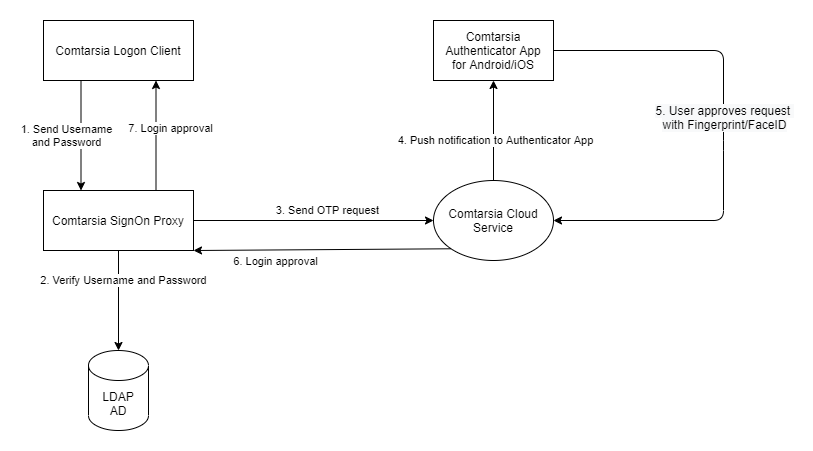
When a user wants to log in, he first enters his username and password as usual. On checking the credentials, the Comtarsia SignOn Proxy sees that for this user a second factor is required and sends a push notification request through the Comtarsia Cloud Service to the Comtarsia Authenticator App running on the mobile of the user. This Authenticator app then displays a popup, asking the user if he wants to log in to the workstation. The user can confirm this using his configured biometric authentication on the mobile. On successful authentication, the app sends back a secure message to the SignOn Proxy, which then allows the user to login. This is illustrated in the following drawing:
The enrolment of COTP simply works by scanning a QR code with the Comtarsia Authenticator app.
2.4 Account Session Password
The Account Session Password (ASP) is a functionality that can be enabled for users in addition to the MFA login. It replaces the user password in the directory with a generated password based on a hash of the user password concatenated with configured SessionPasswordKey on the SignOn Proxy. This hash is then used to create a password as defined by the AuthSessionPasswordTemplate rule.
The ASP functionality is useful to deny users to logon directly to the LDAP/AD directory without using the Comtarsia Logon Client.
3. System requirements
The following minimum versions are needed for the full MFA functionality described in this guide:
- Logon Client Build 6.2.2.0 or above
- SignOn Proxy Build 6.2.1.50 or above
4. Configuration of the SignOn Proxy
A license key needs to be installed that supports the MFA type that is intended to use. The evaluation license key included with every SignOn Solutions bundle has the TOTP, HOTP and FIDO2 MFA types enabled. To test the Comtarsia push notification COTP a special license key is required. Such a key can be obtained for free by registering an account at my.comtarsia.com. In the login area, ….
To configure the SignOn Proxy, open the Management Console. All the related configuration values can be found under “Logon Policy” -> “Account Management”.
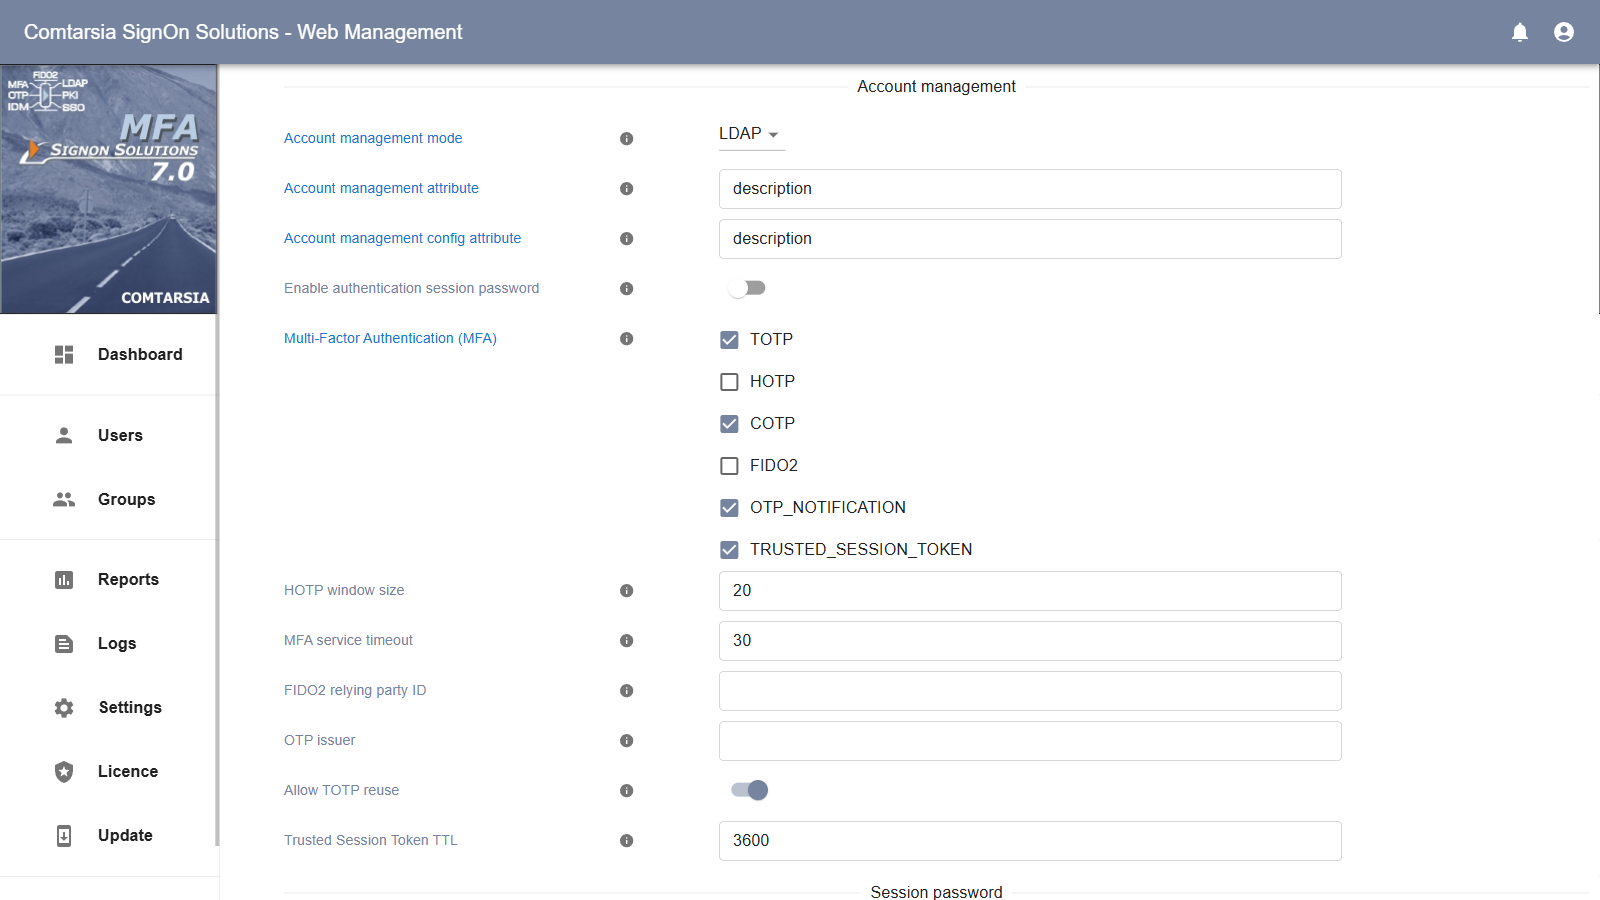
First, the account management mode must be selected. This specifies if the information about the MFA device in use by a user and if a user should use MFA for login is stored in the LDAP/AD directory or in an embedded database.

4.1 Account Management Mode Database
Using this mode, all the account management information is stored in a database file using a SignOn Proxy embedded database engine. For every user and every group in the directory that is actively used, an entry in the database containing the MFA settings is created. This has the advantage that no additional information has to be stored in the LDAP/AD directory and therefore, this solutions can also be used in scenarios where the LDAP/AD directory cannot be touched.
This mode has only one configuration parameter, the „Account management database path” which defines the full path to the database file. If this file does not exist, a new databse is created, so be careful when changing this parameter when the database is already populated.
If more than one SignOn Proxies are in use in a loadbalancing configuration, this file must be shared between all SignOn Proxy instances using a SMB share.
The SignOn Proxy runs in the context if the system user, so the ACL must be set accordingly.
4.2 Account Management Mode Directory
If the MFA information should be stored directly into the LDAP/AD directory, this mode must be chosen. It requires the definition of the following two attributes:
- accountMgmtAttribute Specifies a string attribute with minimal 1024 characters length in user objects for the MFA and Authentication Session Password function in Directory Mode.
- accountMgmtConfigAttribute Specifies a string attribute with minimal 1024 characters length in group objects that will be used to store MFA or account session password enrollment information. This attribute is required for MFA and Authentication Session Password function in Directory Mode.
The SignOn proxy reads and writes these attributes in the context of the configured system user (see in the Management Console “System” -> “User”). The ACL in the directory must be set so that the system user is able to query, read and write these attributes. The users themselves should not be able to read or write these attributes.
The attributes used for the “Account management attribute” and the “Account management config attribute” must be of type string and should support string with a maximum length of 1024 characters. It is possible to use attributes that already exist in the user or group object e.g. the “description”. An existing value in these attributes will be overwritten.
When setting MFA information for a group in the Comtarsia User Management, the defined LDAP/AD attribute is written. This will be a value starting with “CAM1…”. If it does not work, check the directory ACLs. Same for the users, a a user login the configured attribute is written with a value starting with “CAM1…”.
Further important configuration values are:
- enableMFA This setting defines which MFA authentication methods are available to the users. “Enable COTP” must be checked for the app push authentication to work.
- OTPIssuer Defines the OTP Issuer. This is only displayed in the authenticator app. Maximum of 25 characters. This value is used for TOTP/HOTP/COTP for the user to know where this credential belongs to.
5. Configuration on the Logon Client
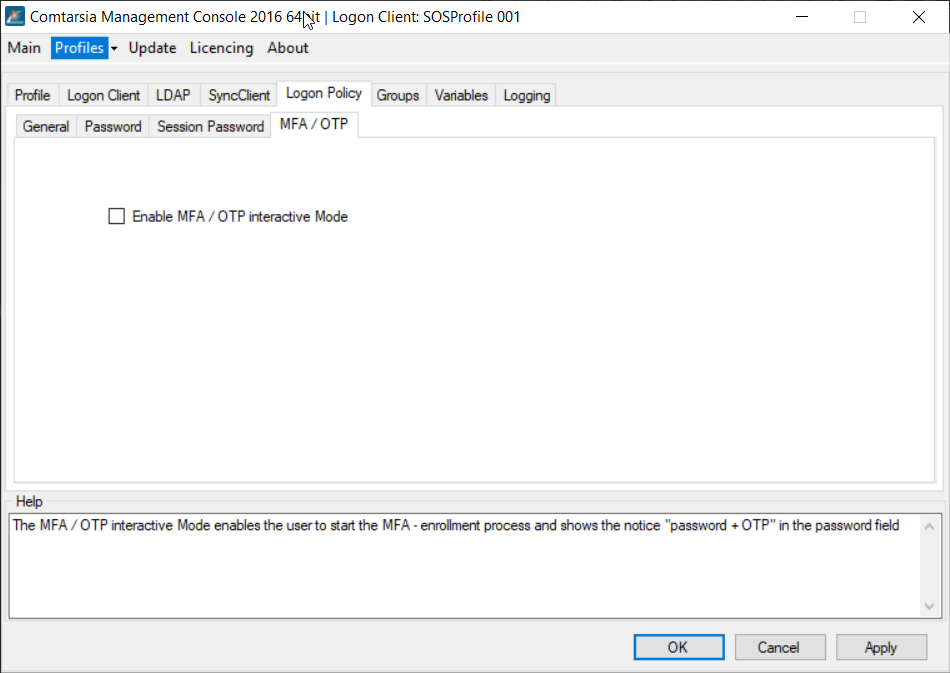
On the Logon Client side, no special configuration is needed for the MFA login to work. The only available option is in the Mangement Console under “Logon Policy” -> “MFA/OTP” the MFA / OTP interactive mode which controls if the user can start an OTP enrolment process himself and also if the “password + OTP” notice is displayed in the password field. If a user is forced to enroll an MFA device or if the user has already enrolled an MFA device, this will always work regardless of this setting.
6. Using the Comtarsia User Management Console
Before starting the User Management Console (UserMgmt) it is important that the SignOn Proxy configuration is finished. The UserMgmt uses the same configuration as the SignOn Proxy, so the UserMgmt will work automatically once the SignOn Proxy configuration is finished.
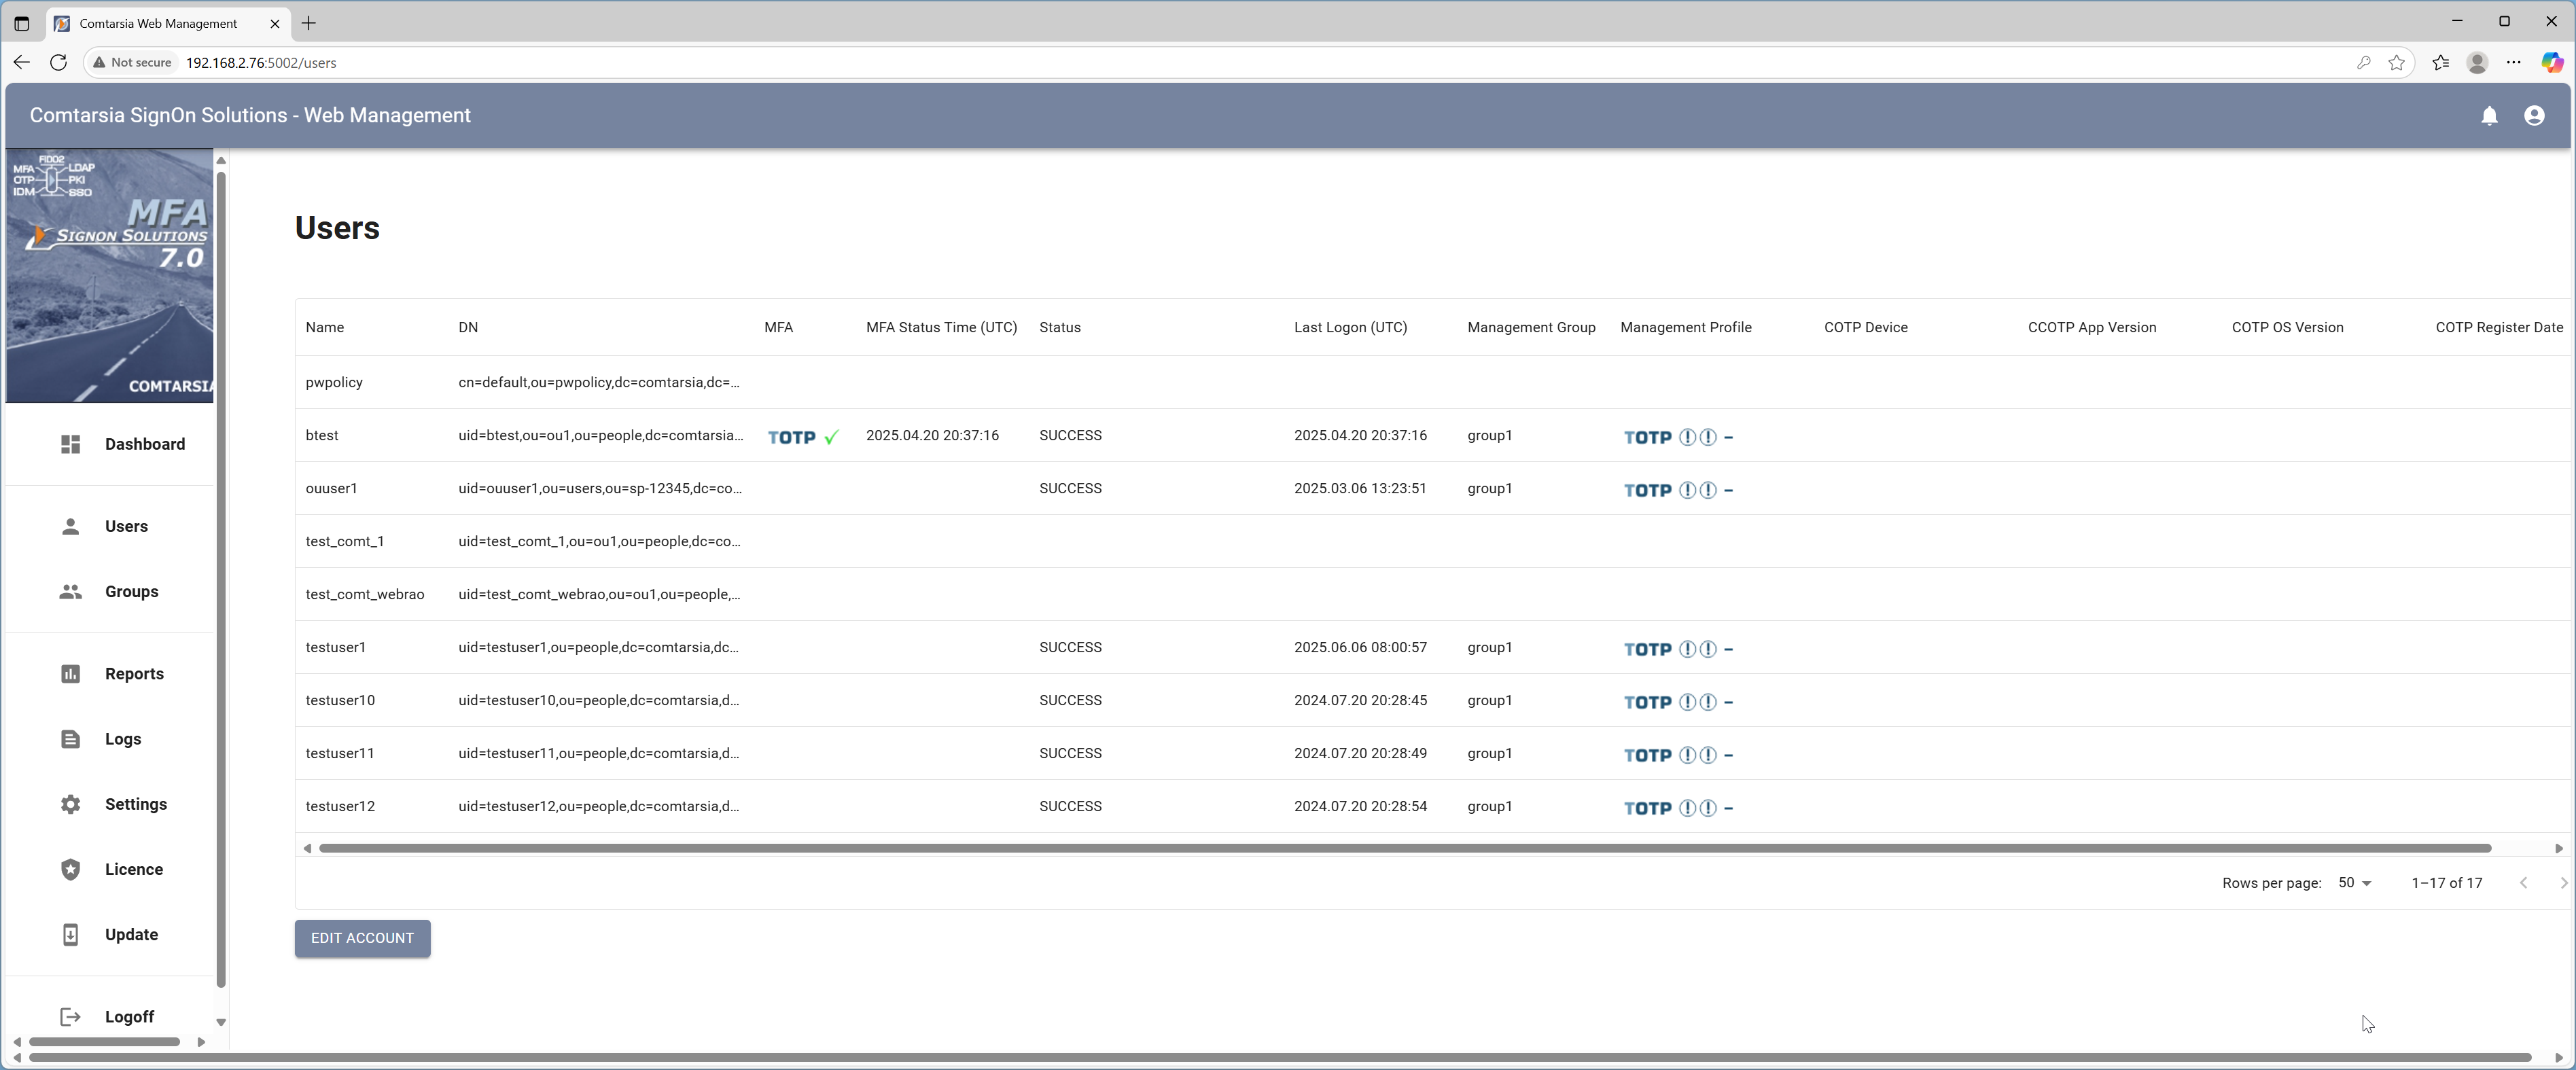
On startup, the UserMgmt displays a list of all users in the directory:
Description of the columns of the user view:
- User Name: Displays the short name of the user as it is used for logon.
- MFA: Shows the currently enrolled MFA device of the user.
- MFA Status Date: The date the MFA status of the user changed for the last time, e.g. from enrolling to enrolled or the change of an MFA device.
- ASP: Shows if the user is currently using an Account Session Password.
- DN: The full DN of the user object in the LDAP/AD directory.
- Management Profile: Shows, if the users should use MFA authentication, which MFA type is allowed and if the user will be forced to enroll.
- Management Group: A Management Profile is assigned to a user with a group. Here the group is shown that contains the relevant profile information.
- Last Logon: The date of the user’s last logon.
- Last Status: The status of the last logon, if successful or failure.
- MFA Device: Displays details about the MFA device the user is actively using (if any).
- OS/App Version: If the user uses the Comtarsia Authenticator app as an MFA device, here the OS and app version will be displayed
Right-clicking in a row will display a context menu, which allows to edit the user account or to modify the assigned management group.
Choosing edit user will bring up a dialog where details about the user’s last logon status, MFA device in use and the management group are shown. If the user has an MFA device assigned, the Administrator has the option to remove it from the user account. This can be useful if the MFA device is lost and the user needs to login without. Furthermore, the user can also be removed from his current management group. When doing this, the user can continue to use his current enrolled MFA device but be cannot re-enroll anymore.
Management groups are further described in the next section.
In the middle/top section of the UserMgmt application there are radio buttons that allow switching the view from the user list to a group list as shown below:
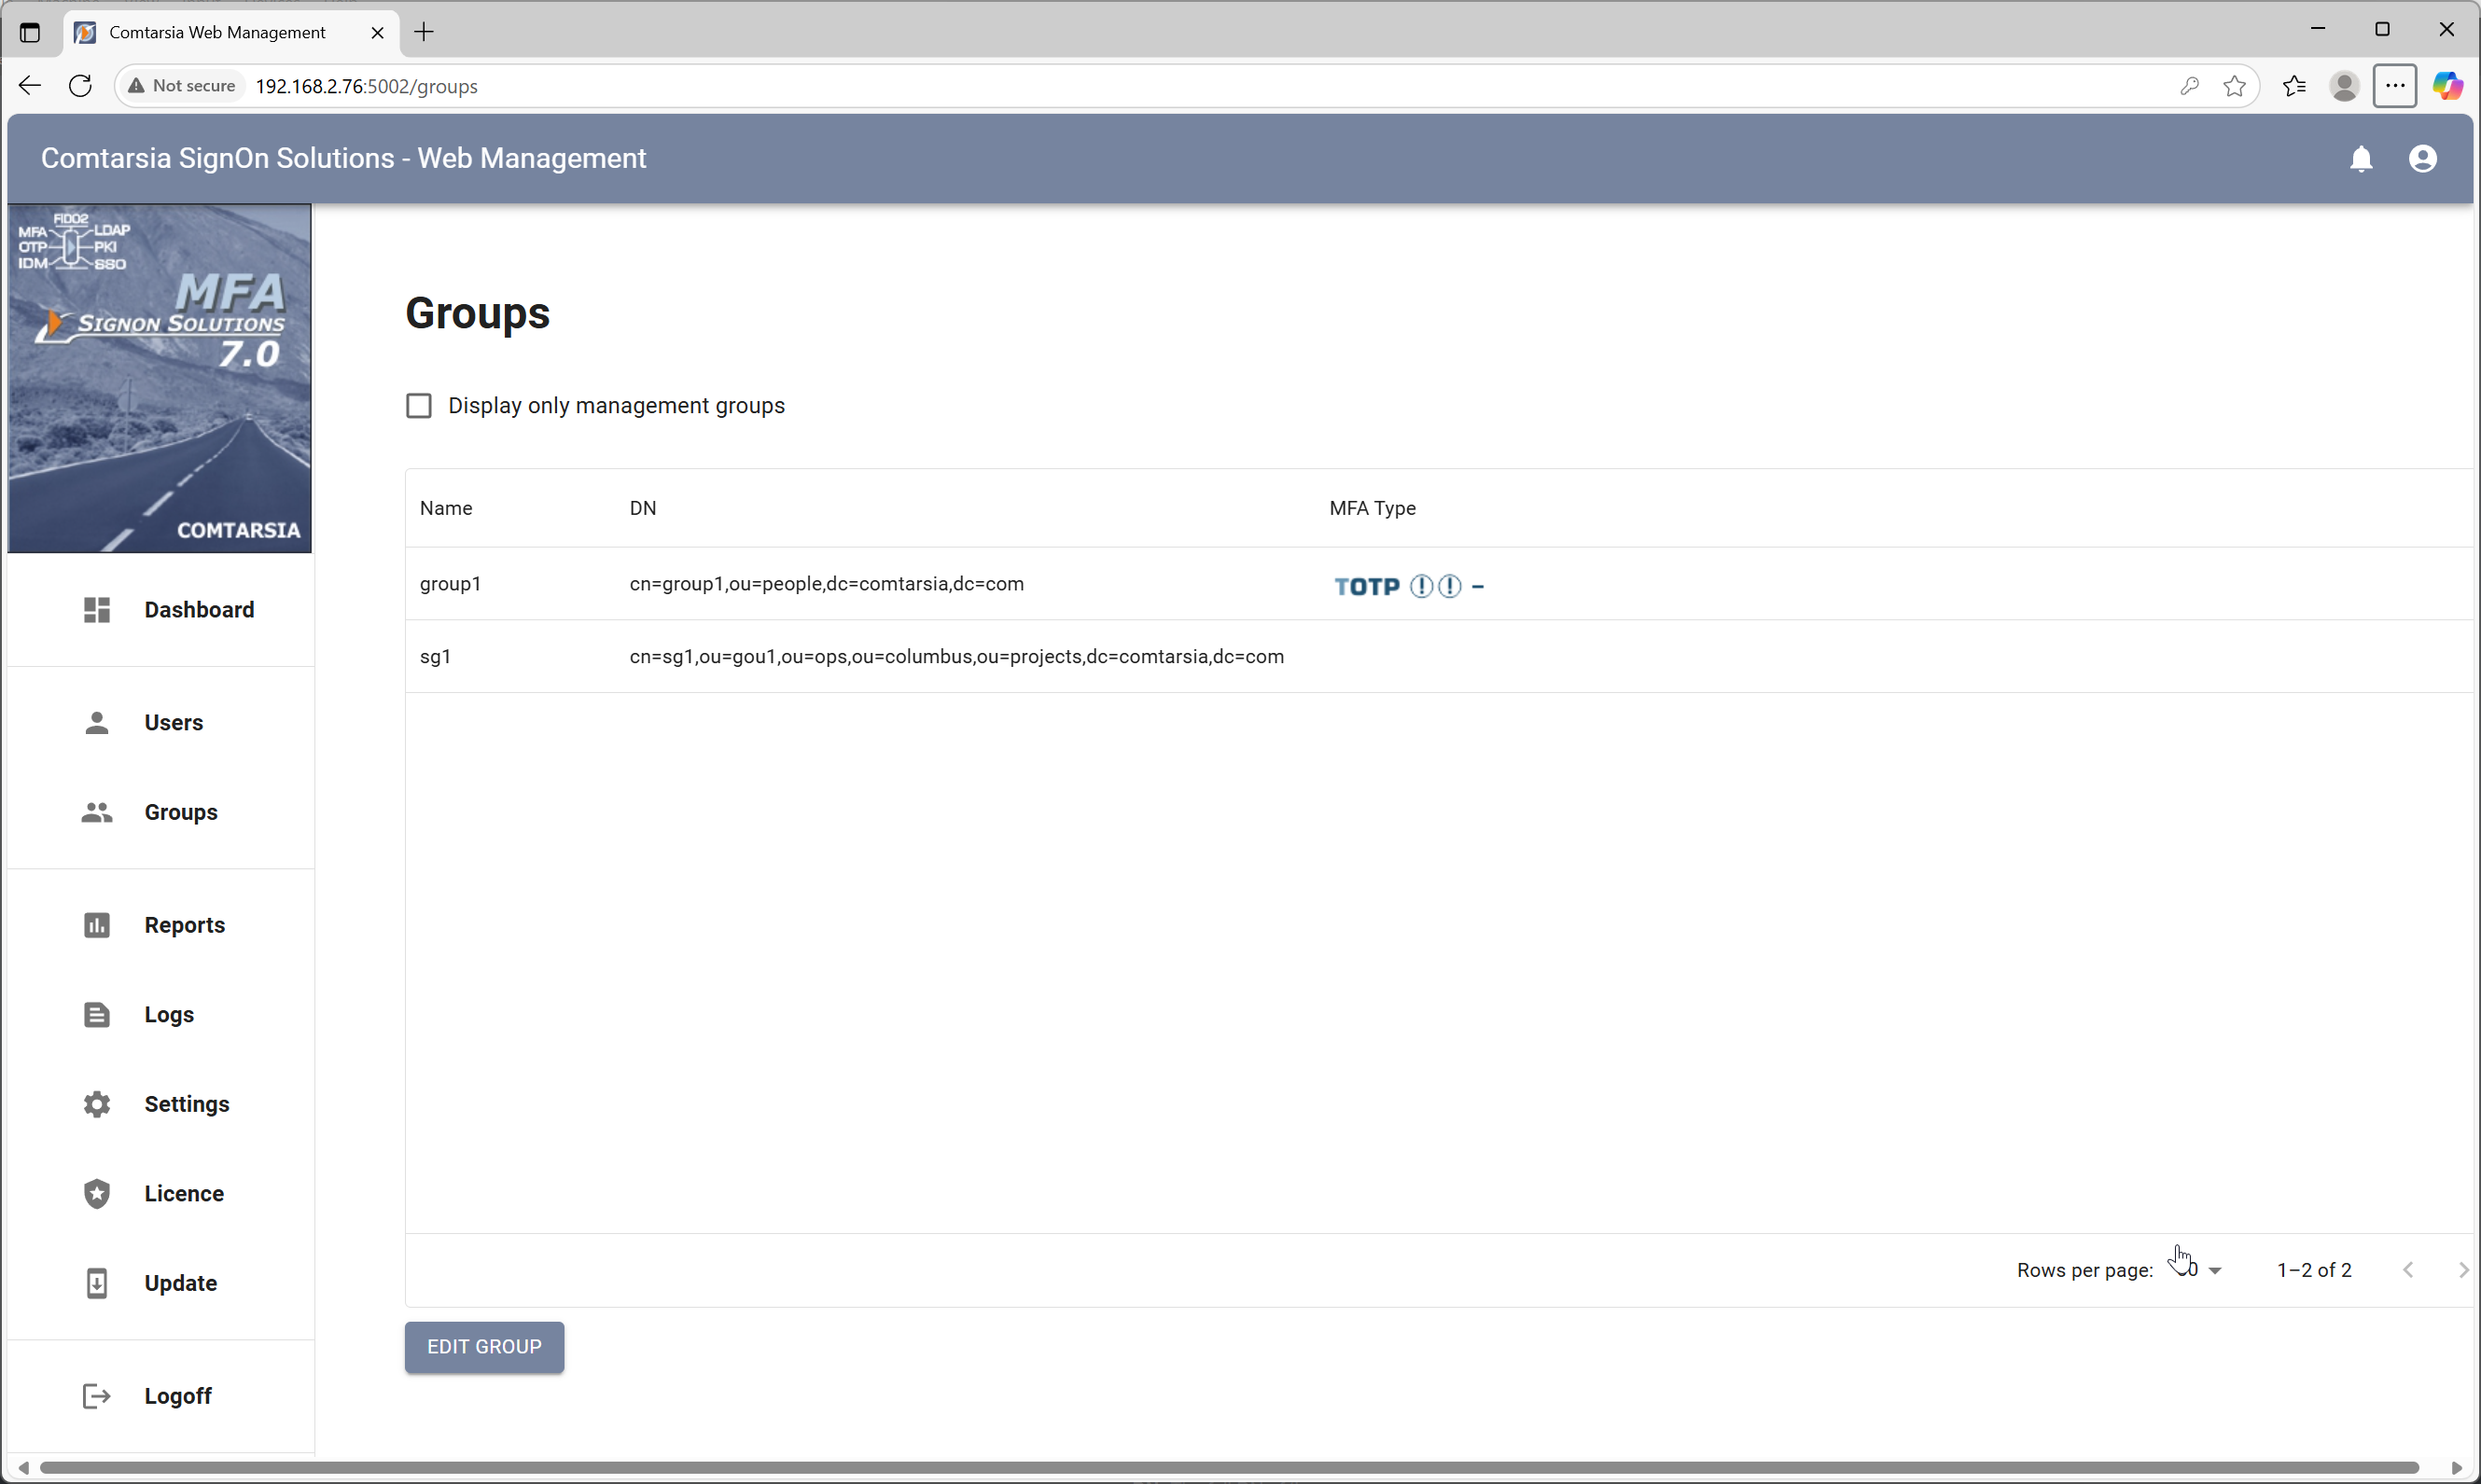
Description of the columns of the group view:
- Name: Displays the short name of the group.
- MFA Type: Shows the MFA settings configured for this management group. Hovering over the image with the mouse displays a detailed description.
- DN: The full DN of the group.
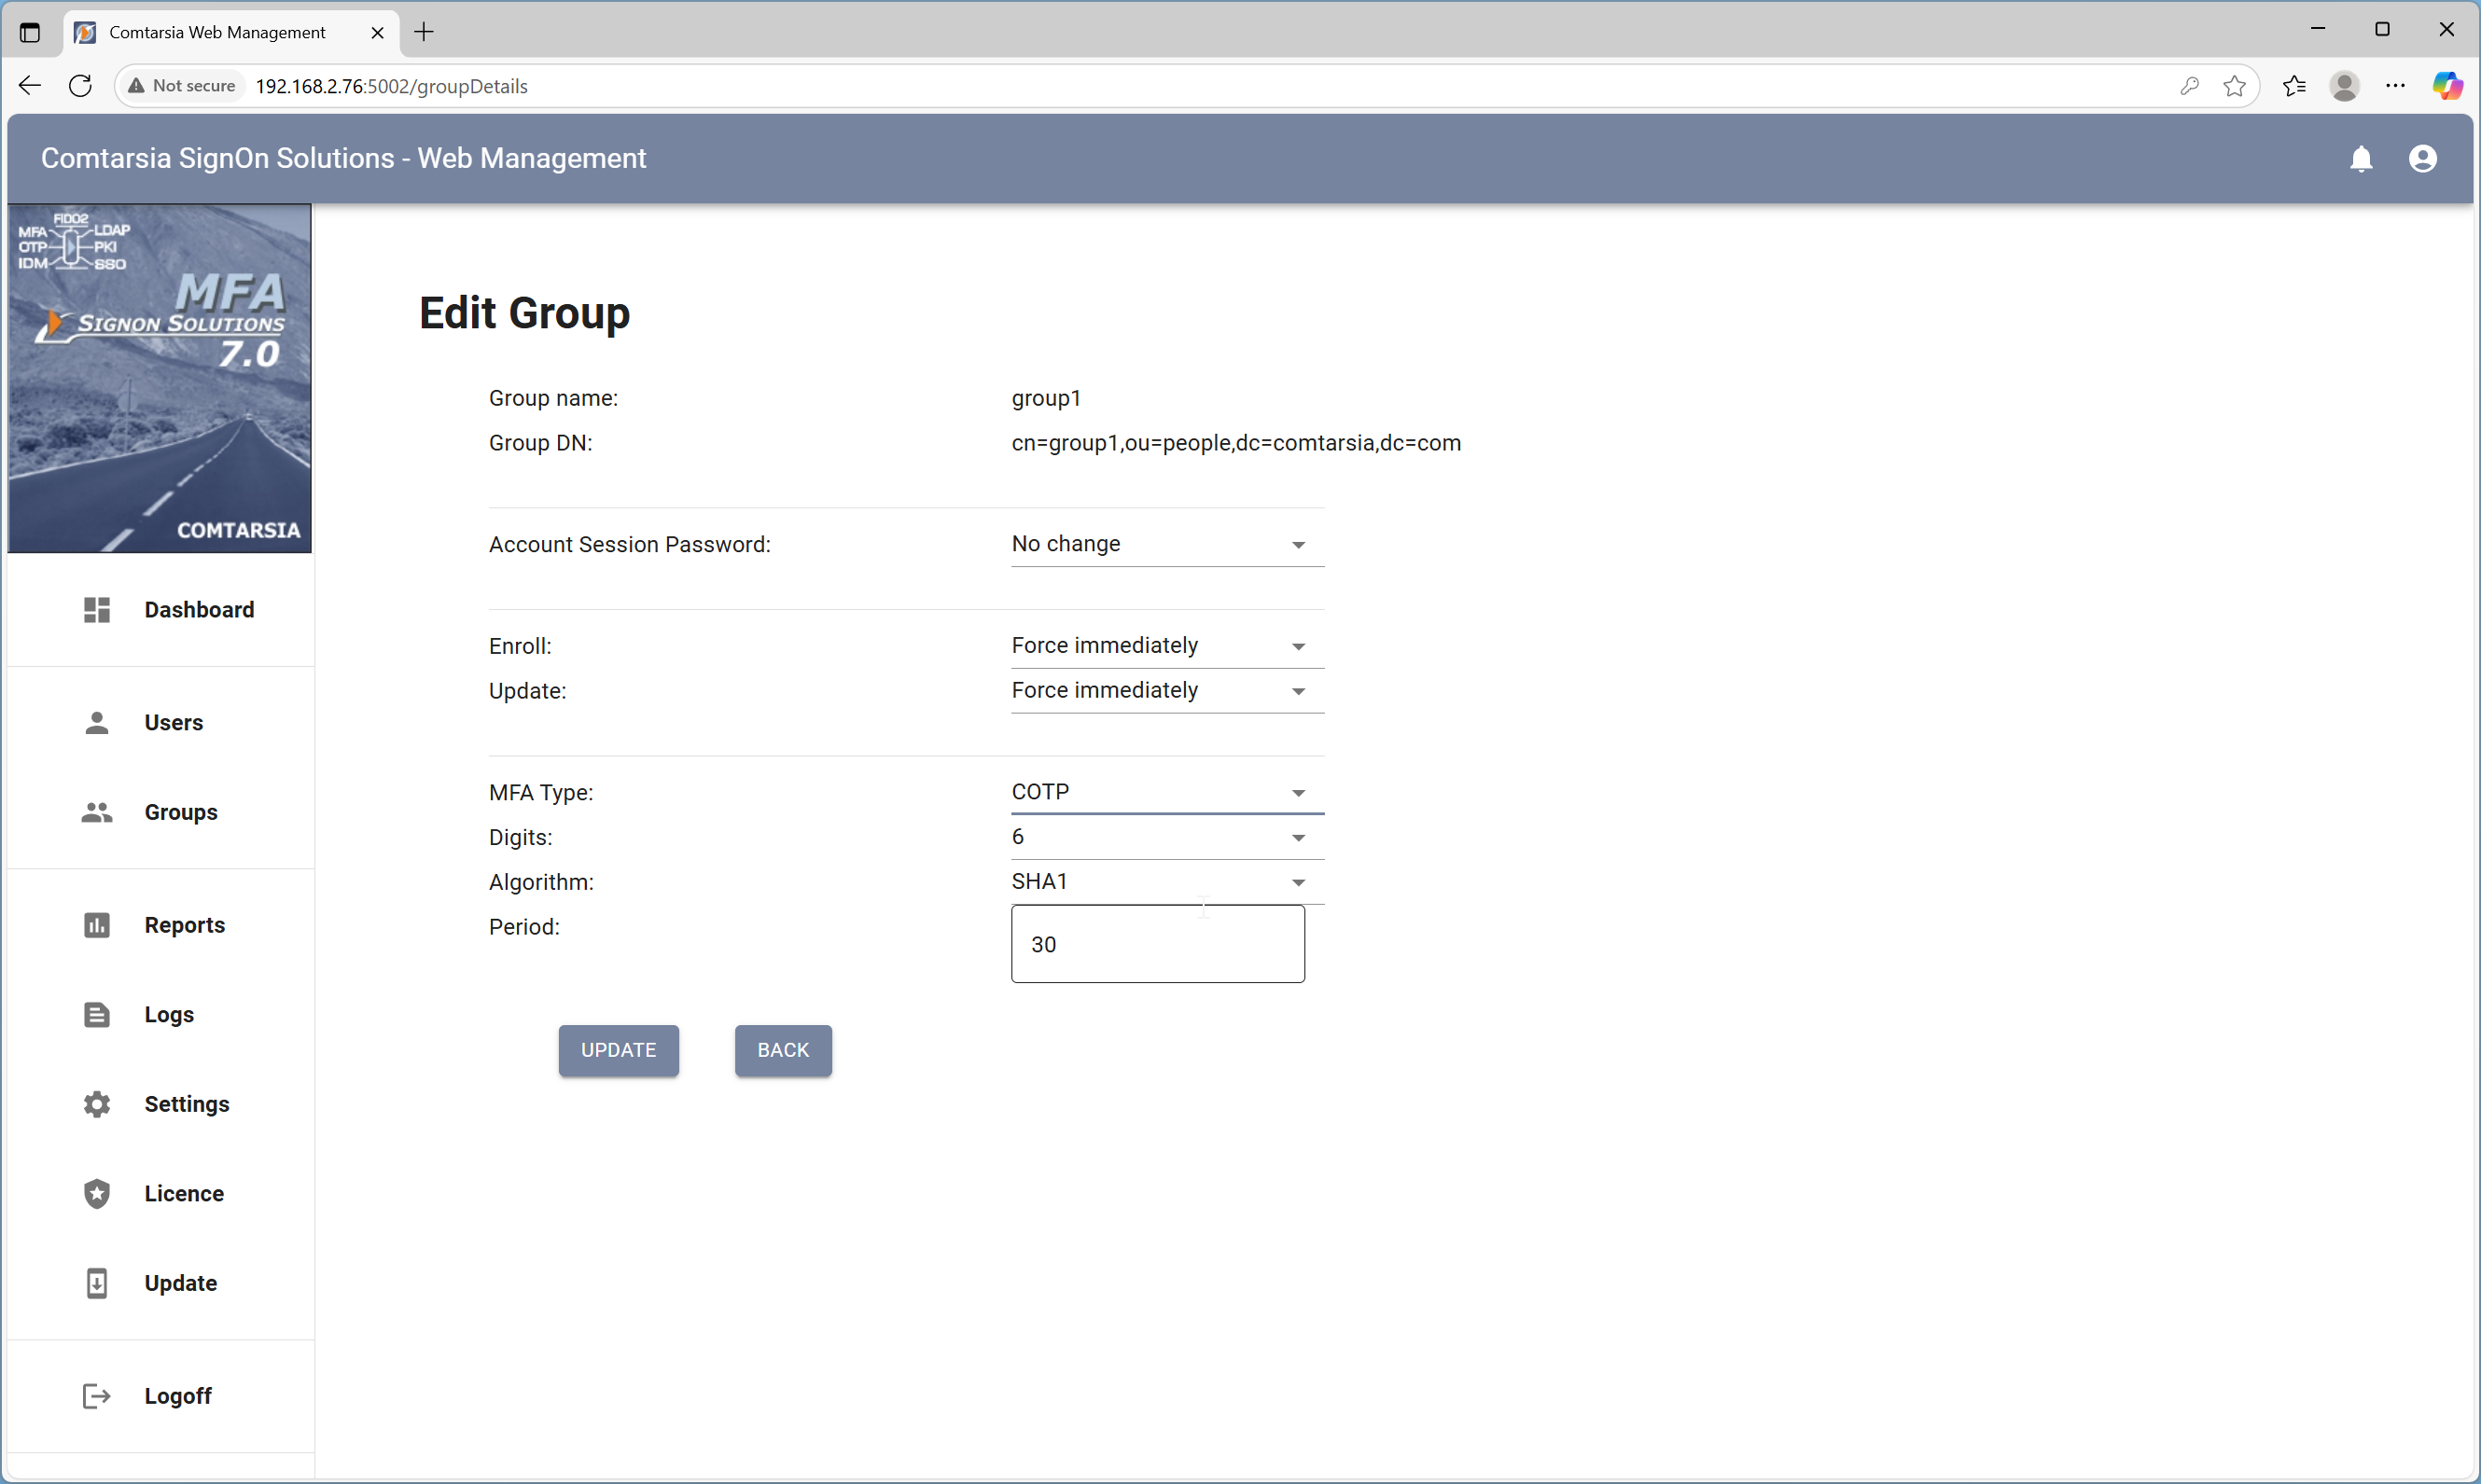
Selecting a group and clicking on Edit Group opens the management group configuration dialog:
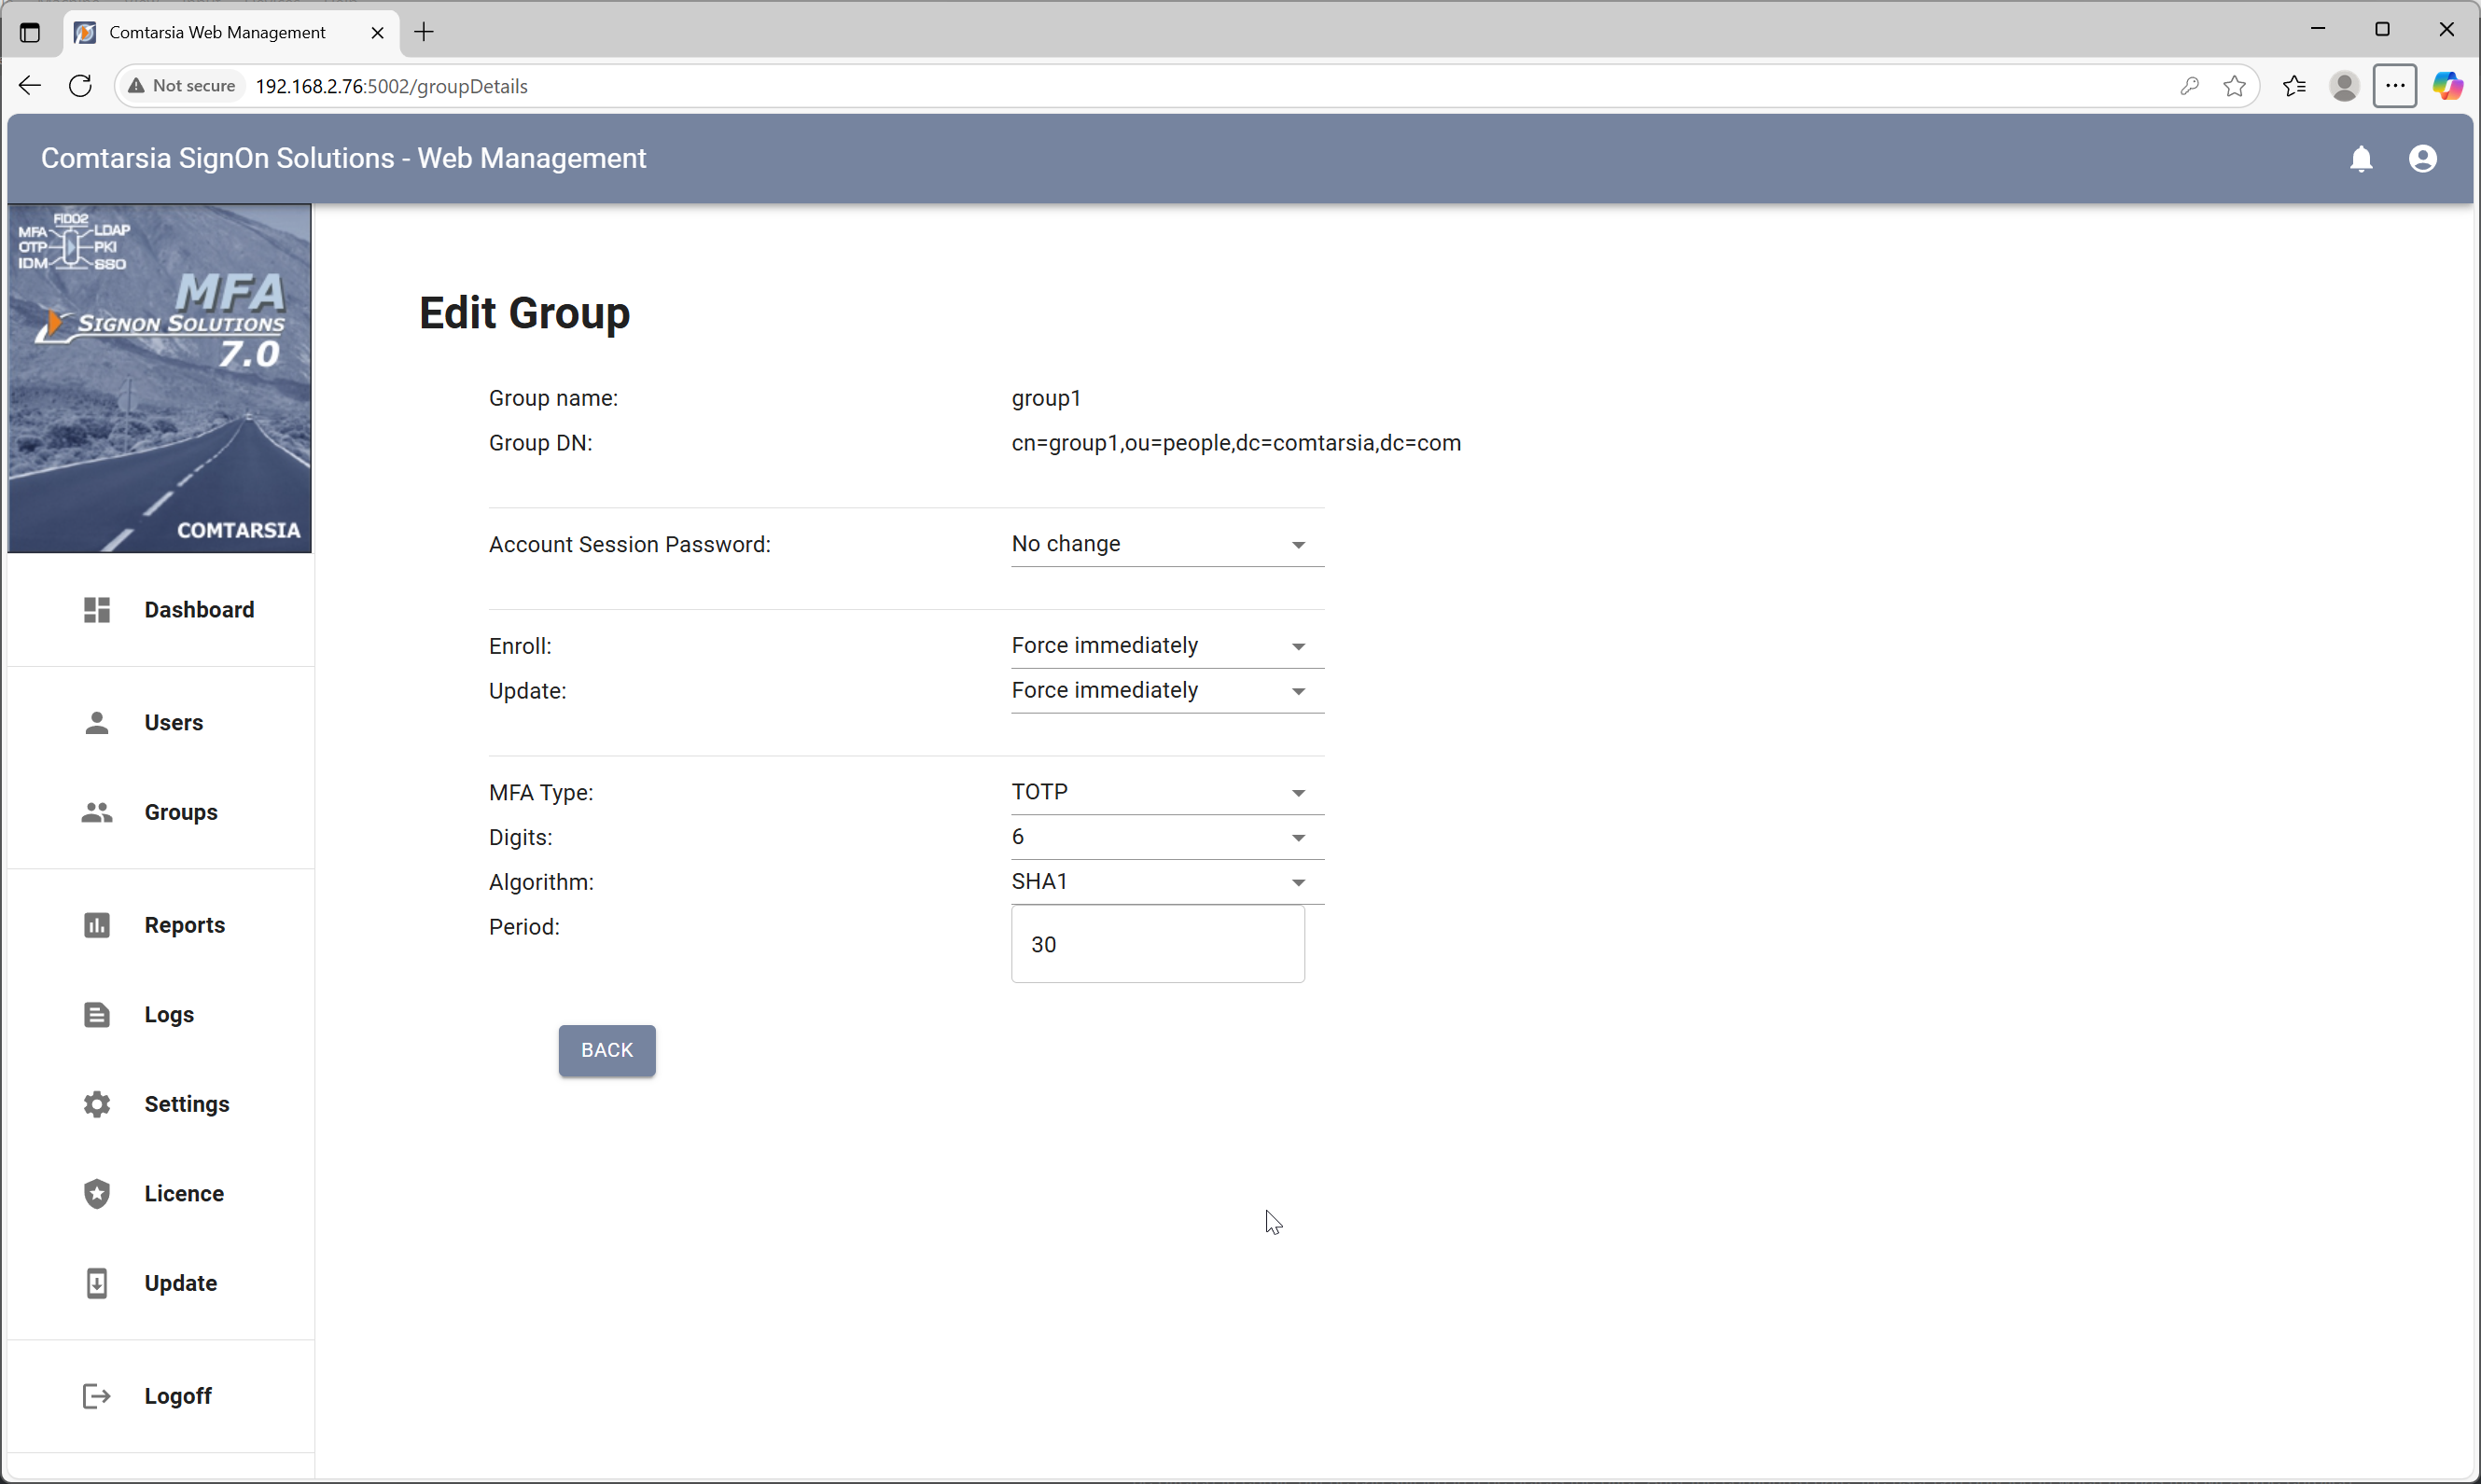
On the left side of this dialog, in the MFA group box, it can be configured which MFA device users should/must use that are member of this management group. The enroll/update settings have four different options:
- “Force immediately”, which means that the users must enroll to this MFA type the next time he logins. Without enrolment, he will not be allowed to log in anymore.
- “Force delayed” allows specifying a date in the future, until when he must be enrolled with this MFA type. On every login before this date is reached, he will be offered to enroll, but he can still log in if he defers the offer. After the configured date, the user can only log in when he has this MFA type enrolled.
- “Optional” means that the user has the option to manually enroll on logon, but he can continue to login without MFA without limit.
- “No change/remove” means that if the user has an MFA device enrolled, it will be removed from his account at the next logon. Further logon can be done without MFA.
The “Enroll” option is used if the user has no MFA device yet, the “Update” option gets active if the user has already enrolled an MFA device.
The MFA type specifies the type of MFA device that the user should/must enroll. Possible options are TOTO, HOTP, COTP and FIDO2. The values available here may be restricted by the license key in use and by the corresponding global configuration setting.
Depending on the MFA type chosen, further configuration options are displayed below. For TOTP, HOTP and COTP these are the number of OTP digits that should be used (between 6 and 8) and the hash algorithm used. TOTO has an additional period, which defines how long (in seconds) an OTP value is valid.
For FIDO2 token the option Resident Key allows to specify, if the credential used for authentication should be created on the token as a resident key or not. Using a resident key means that the credential gets physically stored on the token, which enables the usage of the token for offline logons. The disadvantage is that every token can only store a limited number of resident credentials.
7. The Comtarsia MFA Cloud Service
The Comtarsia MFA cloud service is hosted service running in the Microsoft Azure cloud. This web service has the purpose to bridge the connection between SignOn Proxy and the Comtarsia Authenticator app running on a mobile device. It supports sending push notifications to Android and iOS devices. The MFA cloud services don’t need to be configured manually, the SignOn Proxy automatically connects to the web service and performs the necessary configuration automatically in the background. The communication between the Authenticator App and the SignOn Proxy is end-to-end encrypted. The MFA Cloud Service just routes the messages between these two parties and is not able to see any sensitive information.
The MFA cloud service is reachable at the address mws.comtarsia.com on port 443 (HTTPS), so this address must be reachable from the SignOn Proxy as well as from all mobile devices running the Comtarsia Authenticator App.
The sending of push notifications to the authenticator app is done on Android using Google Firebase Cloud Messaging and on iOS using the Apple Push Notification Service.
For special projects, Comtarsia can deliver a version of the cloud service that can be installed in the customer's own cloud. Contact us for further information.
8. The Comtarsia Authenticator App
The Comtarsia Authenticator App is available for Android devices using at least Android version 6.0 and Apple iOS devices using iOS version XX or higher.
The Android version can be downloaded from the Play Store under this URL: https://play.google.com/store/apps/details?id=com.comtarsia.comtauthenticatorapp
The iOS version is available upon request directly from Comtarsia.
The Comtarsia Authenticator App supports TOTP, HOTP and the Comtarsia developed COTP protocols. This means that besides using it with the Comtarsia SignOn Solutions, the Authenticator can also be used with most web sites that support two-factor authentication like Microsoft, Amazon and so on.
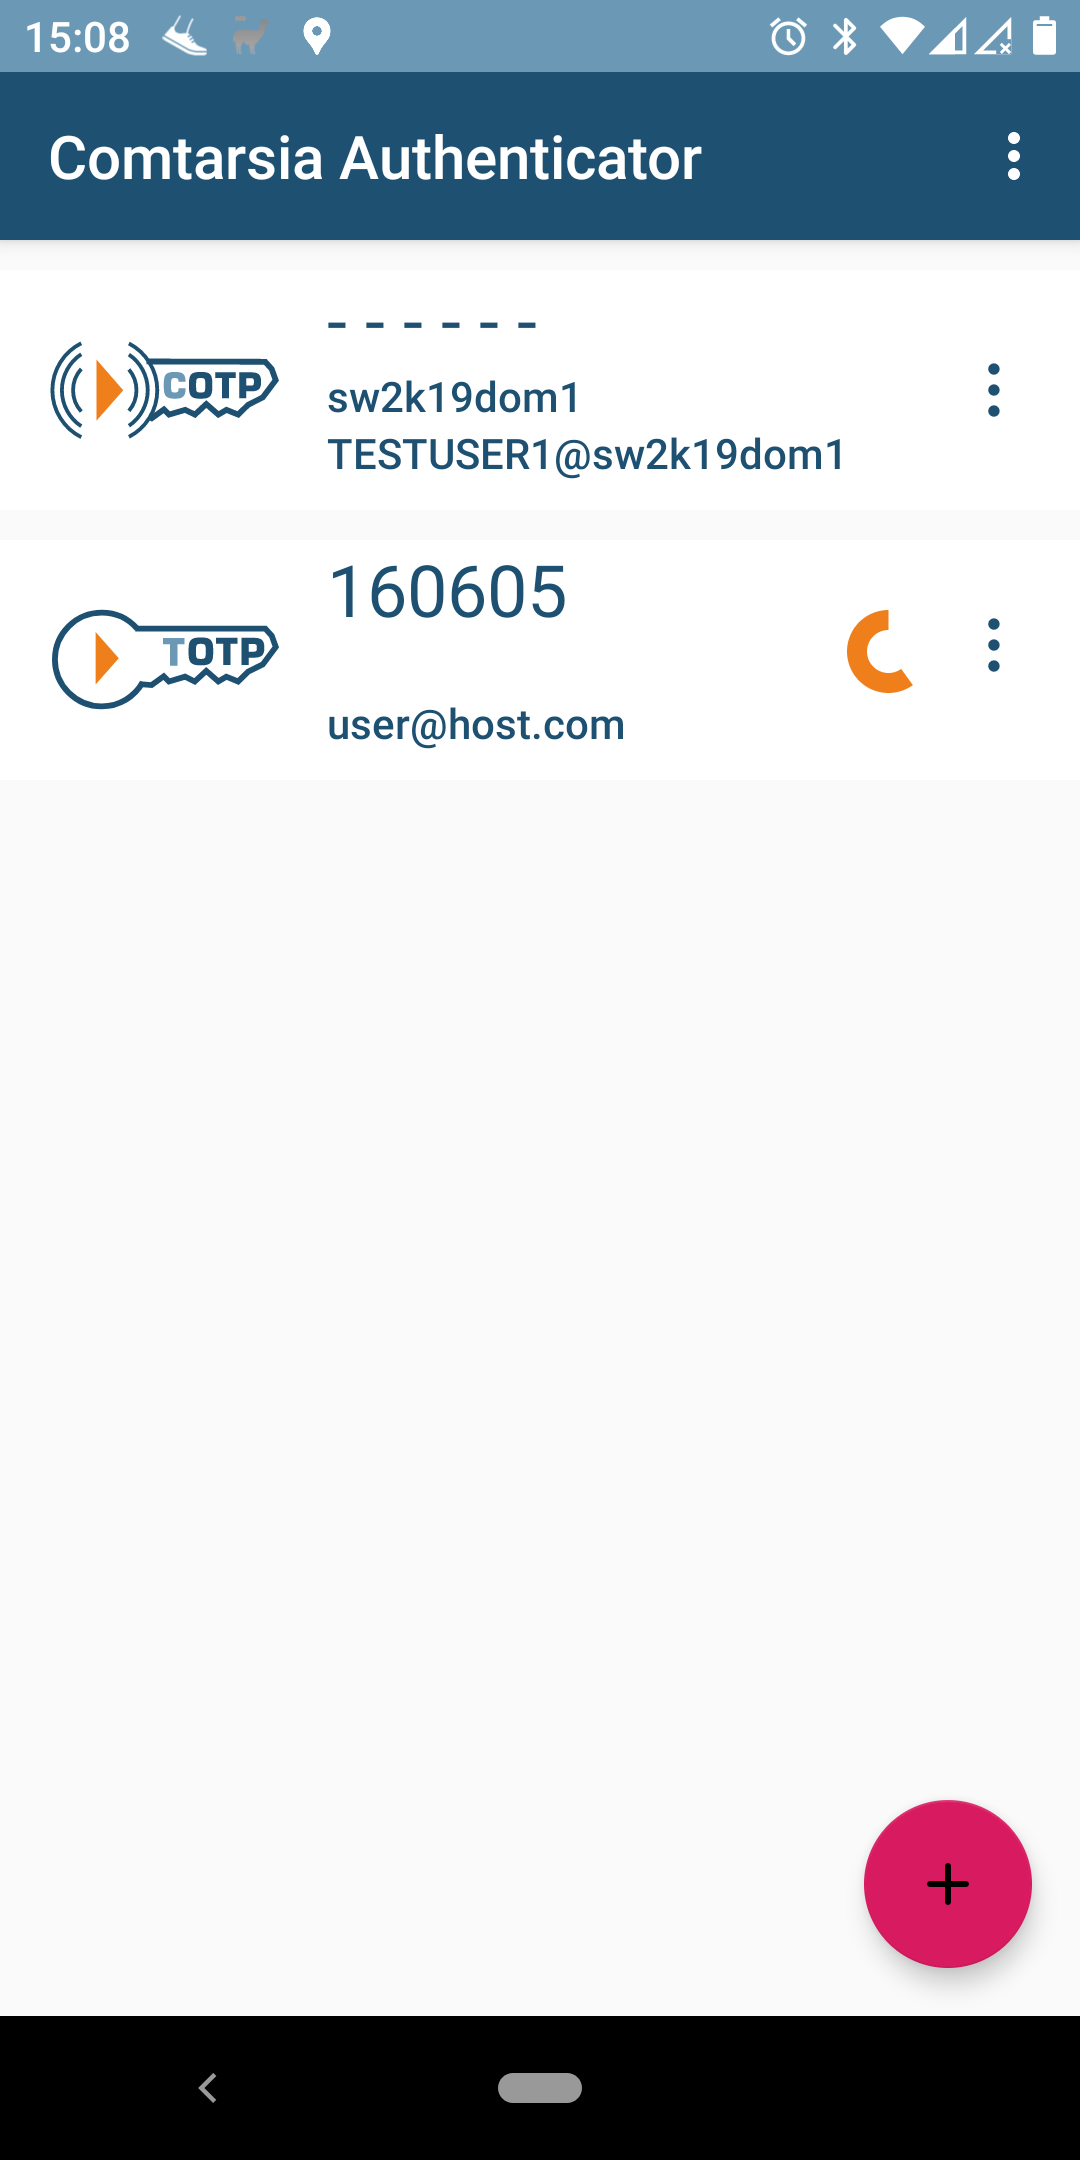
New credentials can be added by scanning a QR code or by manually entering the credential details.
The app requires permission to use the camera to be able to scan QR codes that are used for enrolment. Furthermore, the app needs access to the Internet to check for updates and, if the user is enrolled in COTP, to communicate with the Comtarsia Cloud Service.
9. Example configurations
This chapter describes a few basic configurations of different MFA types. If you have a more complex scenario where MFA should be used, feel free to contact us.
9.1 COTP (push notification OTP) as a second factor for Active Directory
What is needed
- Active Directory domain controller running Windows Server 2016 or Server 2019 where the SignOn Proxy will be installed.
- Client computer running Windows 10 which will host the Comtarsia Logon Client
- Smartphone with Android or iOS where the Authenticator app will run
SignOn Proxy configuration
After installing the SignOn Proxy on the Active Directory domain controller, open the Comtarsia Management Console. Under “SOP” -> “General” set the “Authentication Mode” to “Active Directory”. Under “Logon Policy” -> “Account Management” make the following changes like in the screenshot below. The OTP issuer can be set to a free chosen name, e.g. the name of the domain or the name of the organization.
TODO: [Screenshot: SignOn Proxy Account Management configuration for COTP]
Logon Client configuration
On the tab “Profile” set the authentication mode to “SignOn Proxy”. On the tab “Proxy” set the SignOn Proxy “Primary host” to the hostname or IP of the machine where the SignOn Proxy is installed. Under “Logon Policy” -> “MFA/OTP” check the option “Enable MFA/OTP interactive mode”.
User Management
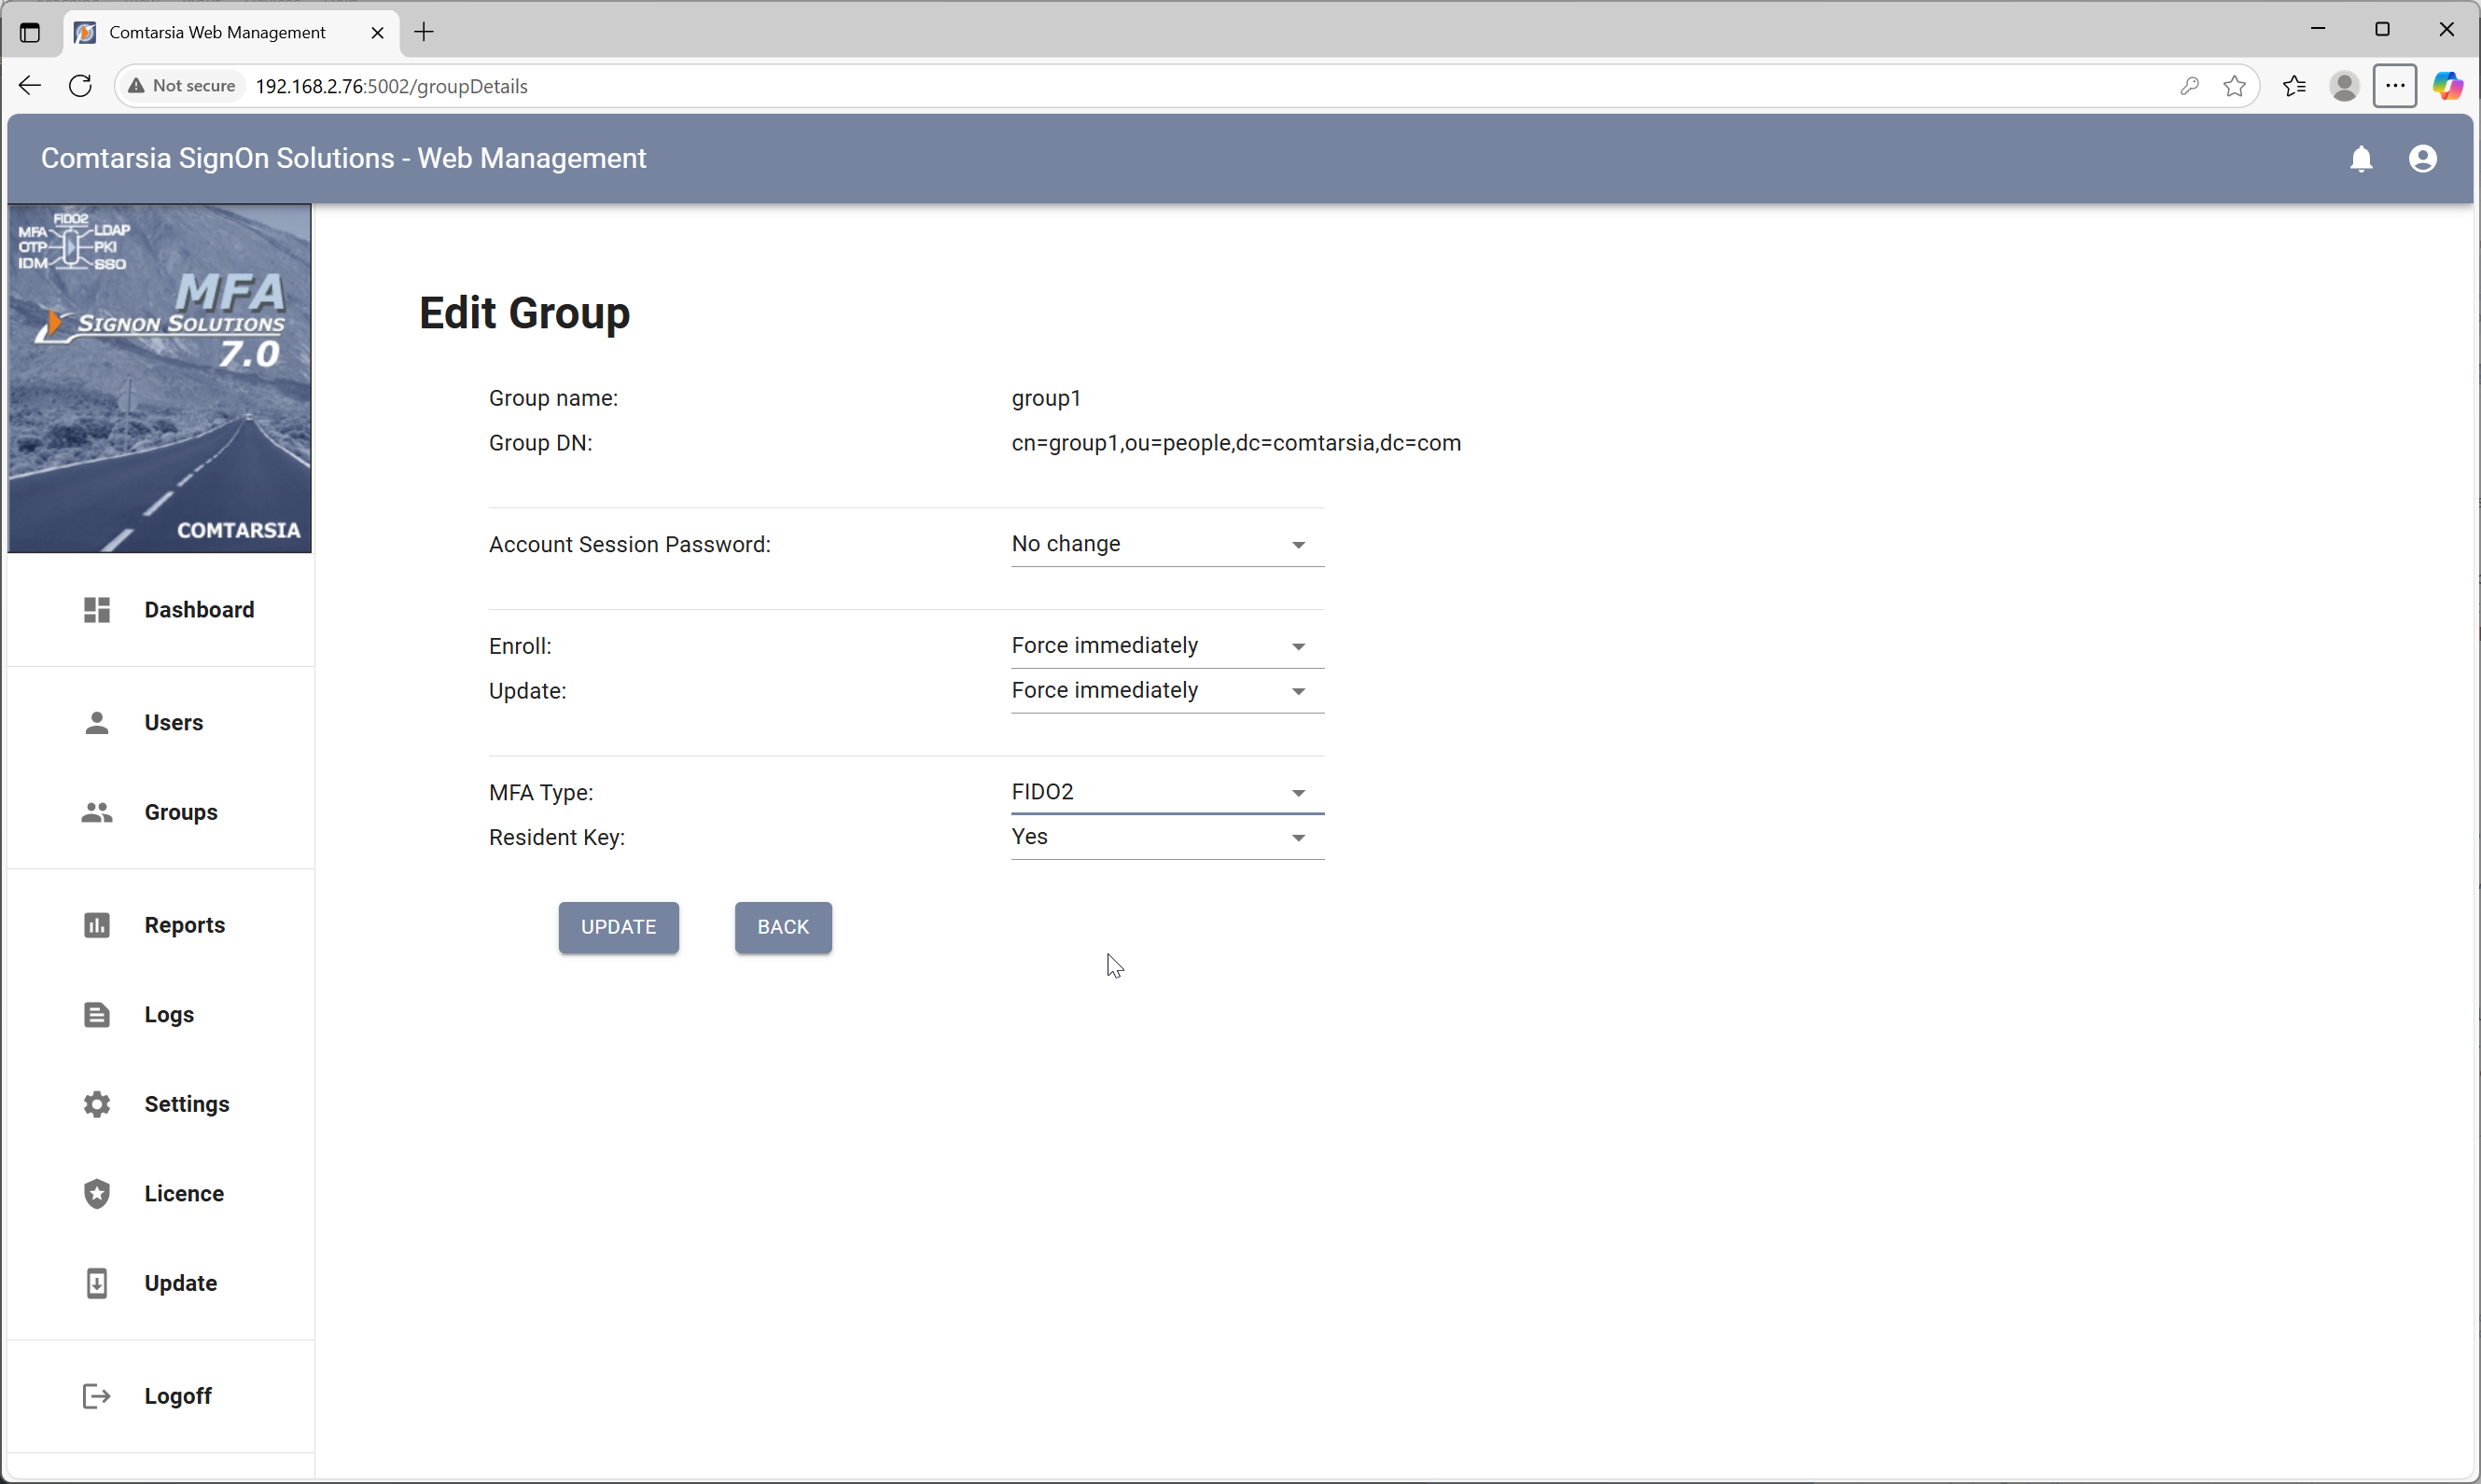
For this example, a test user named “testuser1” is created in the Active Directory. Additionally, a group named “group1” is created. Afterward, the User Management is started and on the group view, the group “group1” is double-clicked. This opens the management settings dialog for the group as seen in the screenshot below:
Enroll and Update are set to “Force immediately”, which means that the user has to enroll the COTP as configured on the next logon. MFA type is set to “COTP”, for Digits, Algorithm and Period the default values are good. Click OK to save the settings and the user is ready to log in.
Enrolment
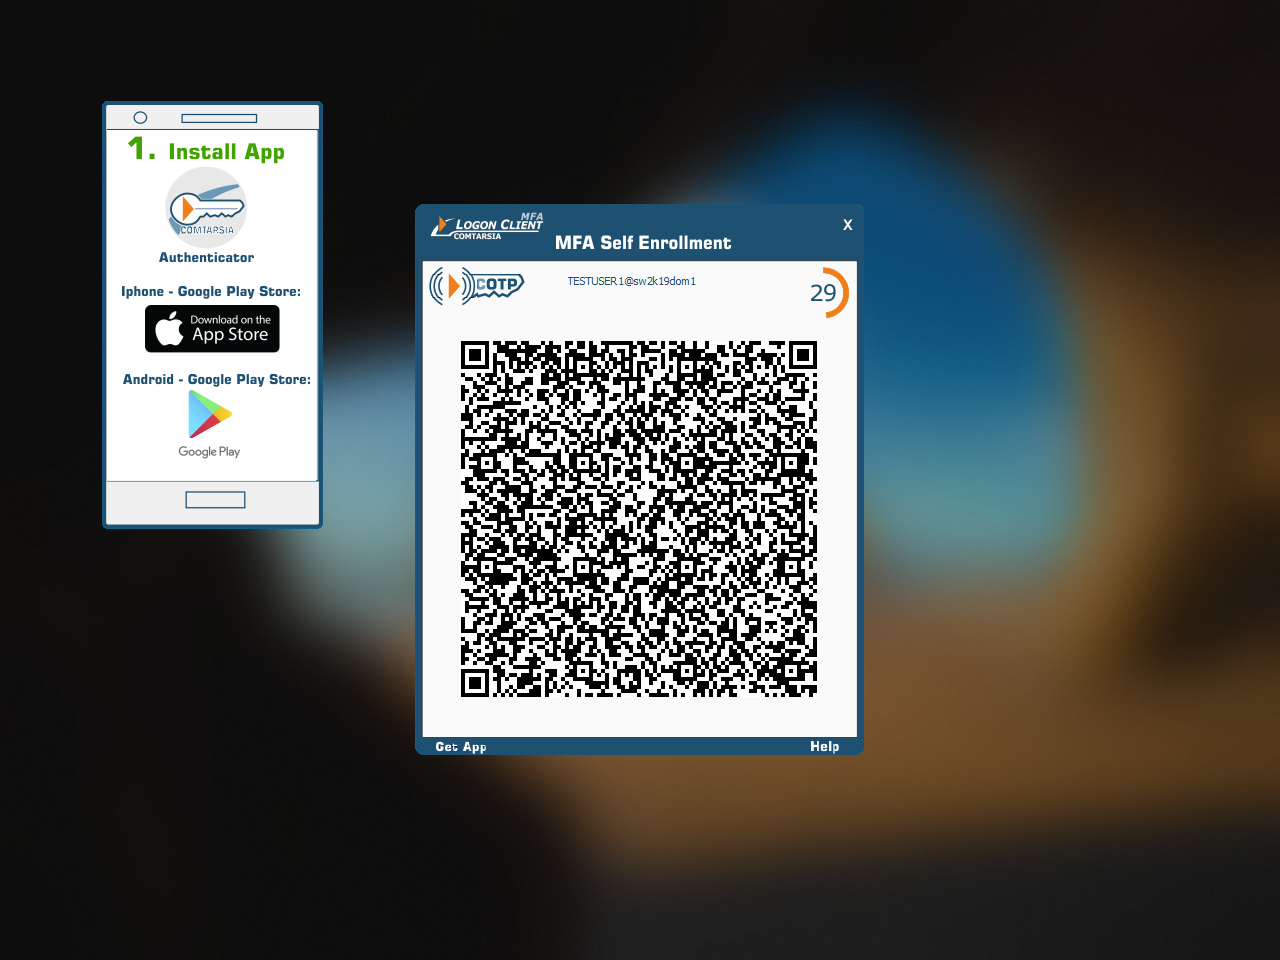
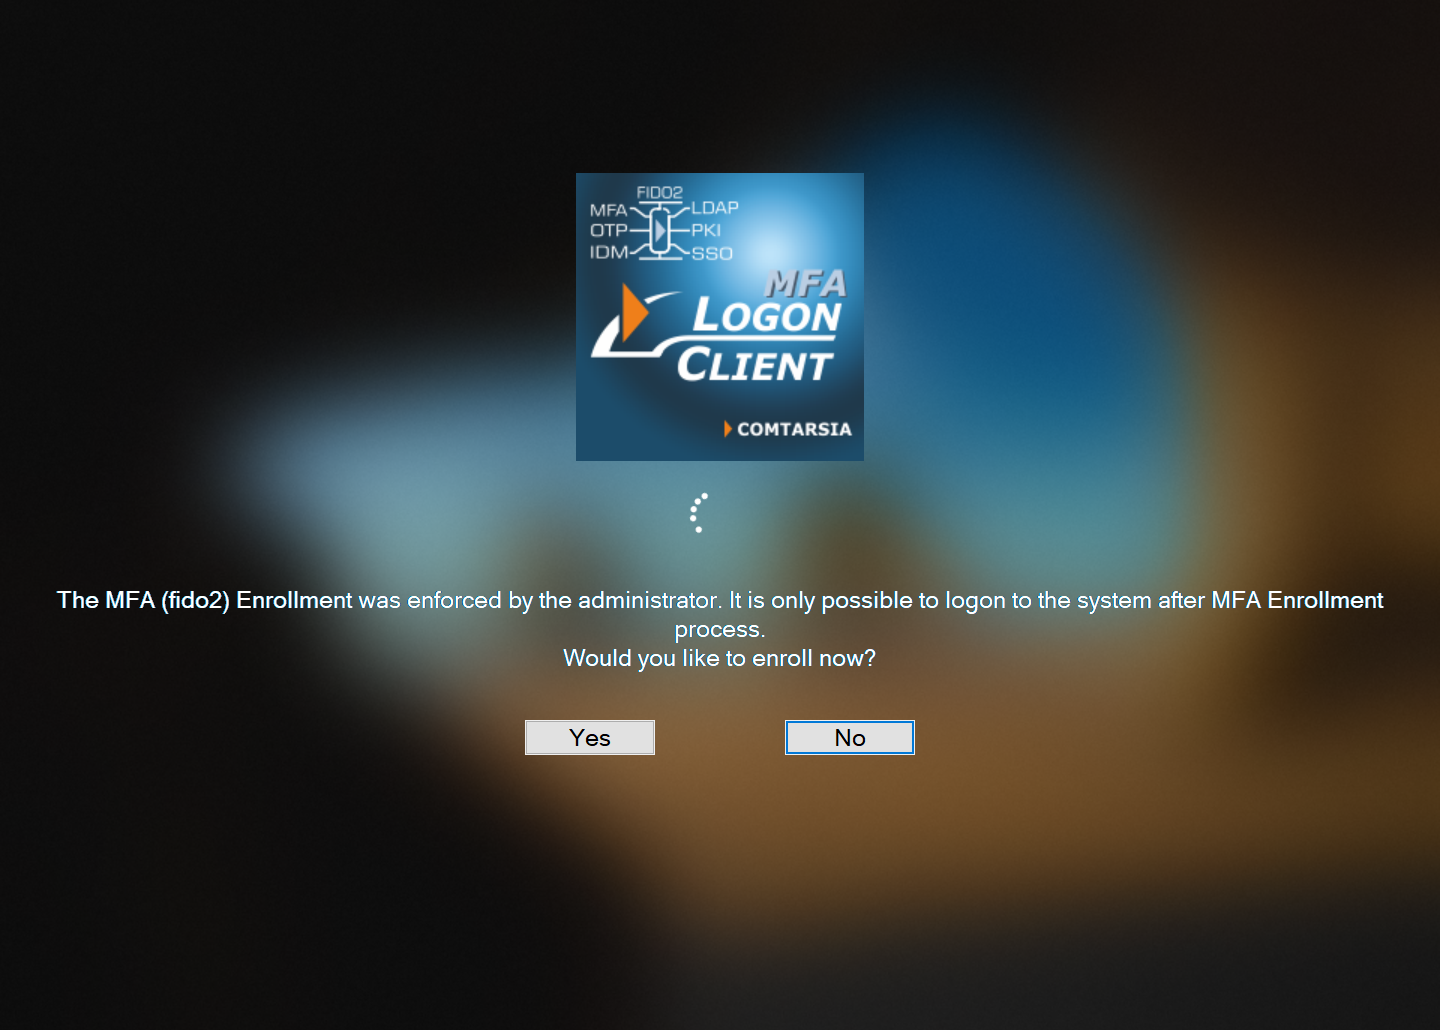
The user enters his username and password into the Logon Client login mask and submits them. The SignOn Proxy checks the credentials and then sends back enrolment data to the client, which will subsequently display the following message:

After clicking “Yes”, the user is presented with a screen that shows a QR code, which should be scanned be the Comtarsia Authenticator app:
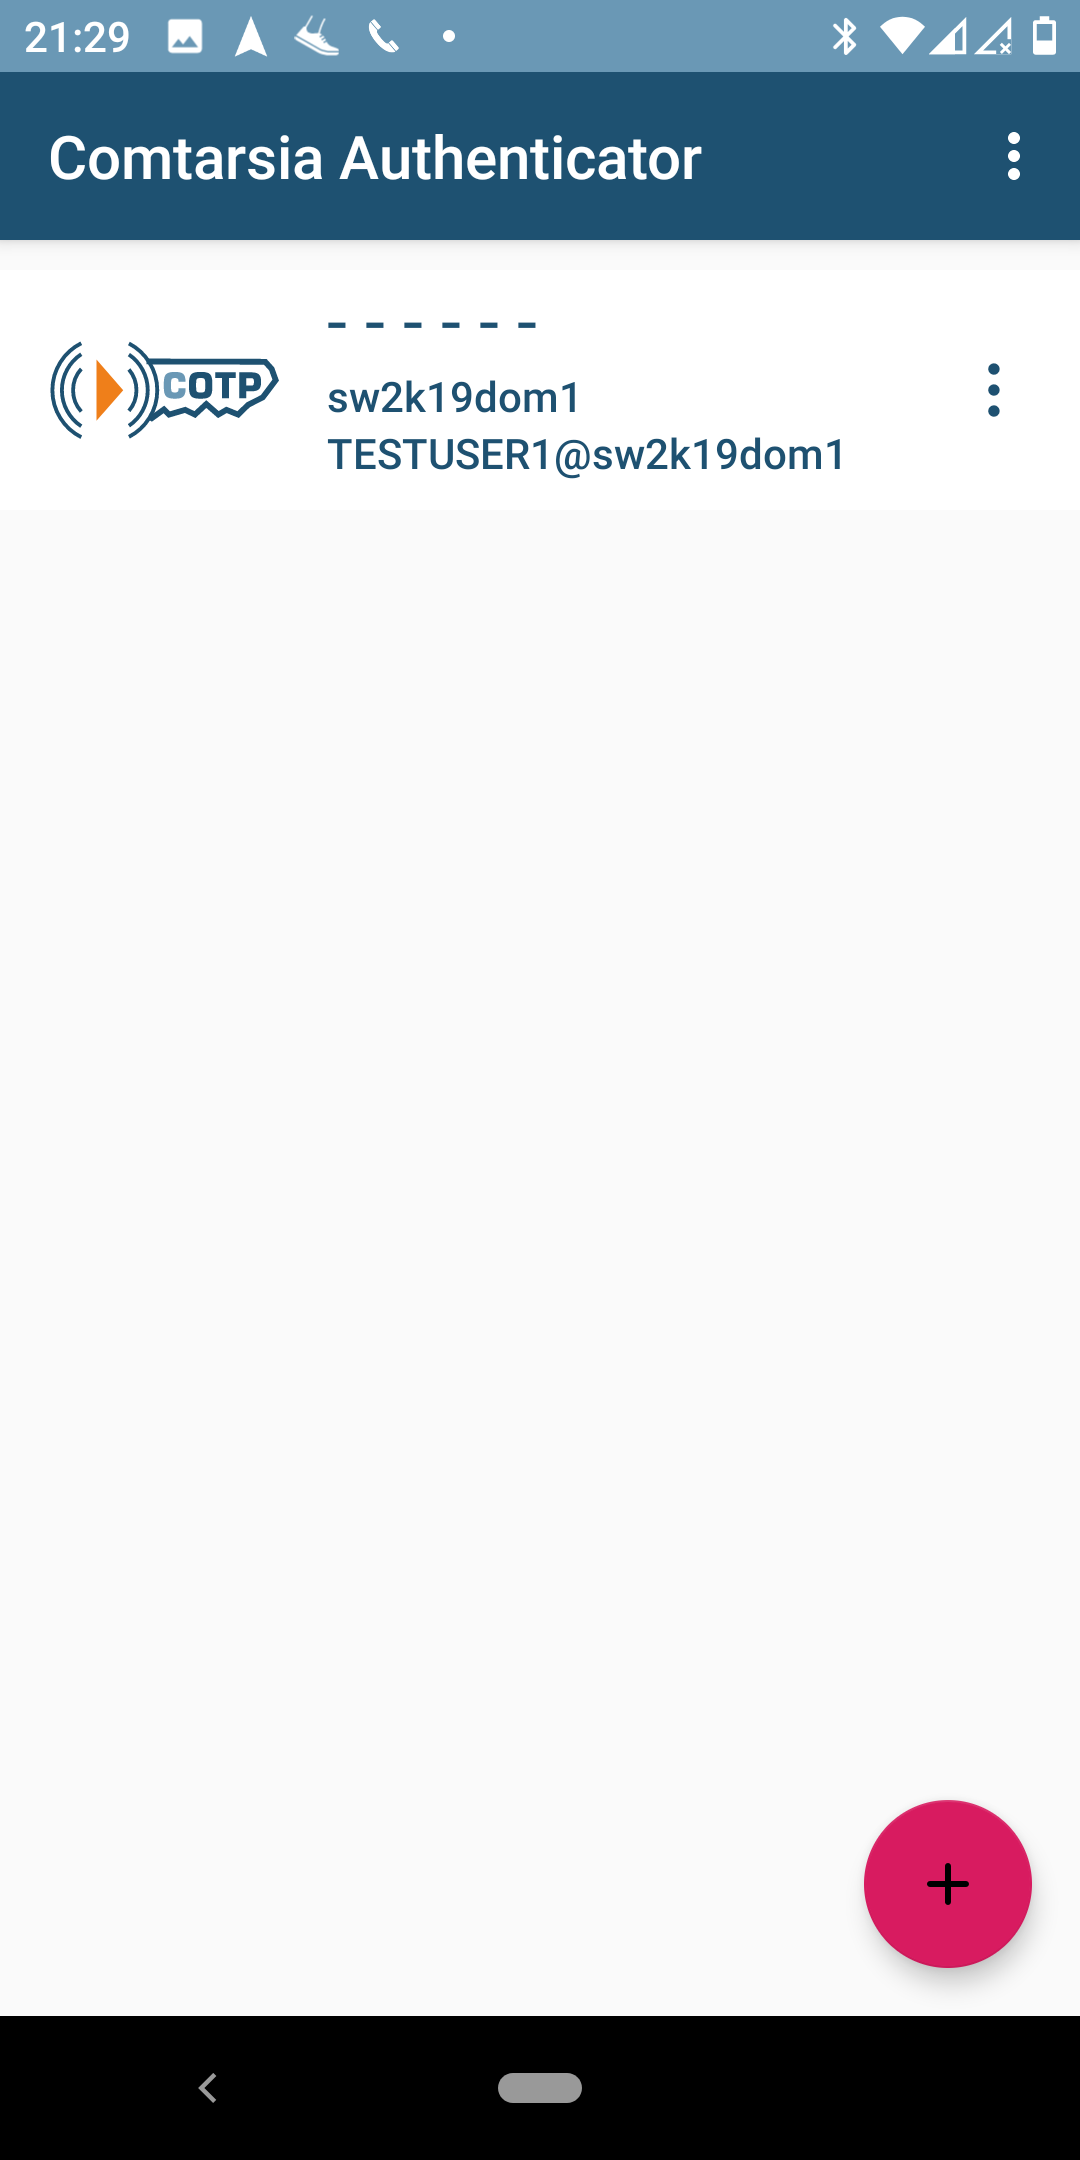
After scanning the QR code and confirming the enrolment, the credential entry can be seen in the Authenticator App:
Now the enrolment process is finished and the user can log in.
First Login
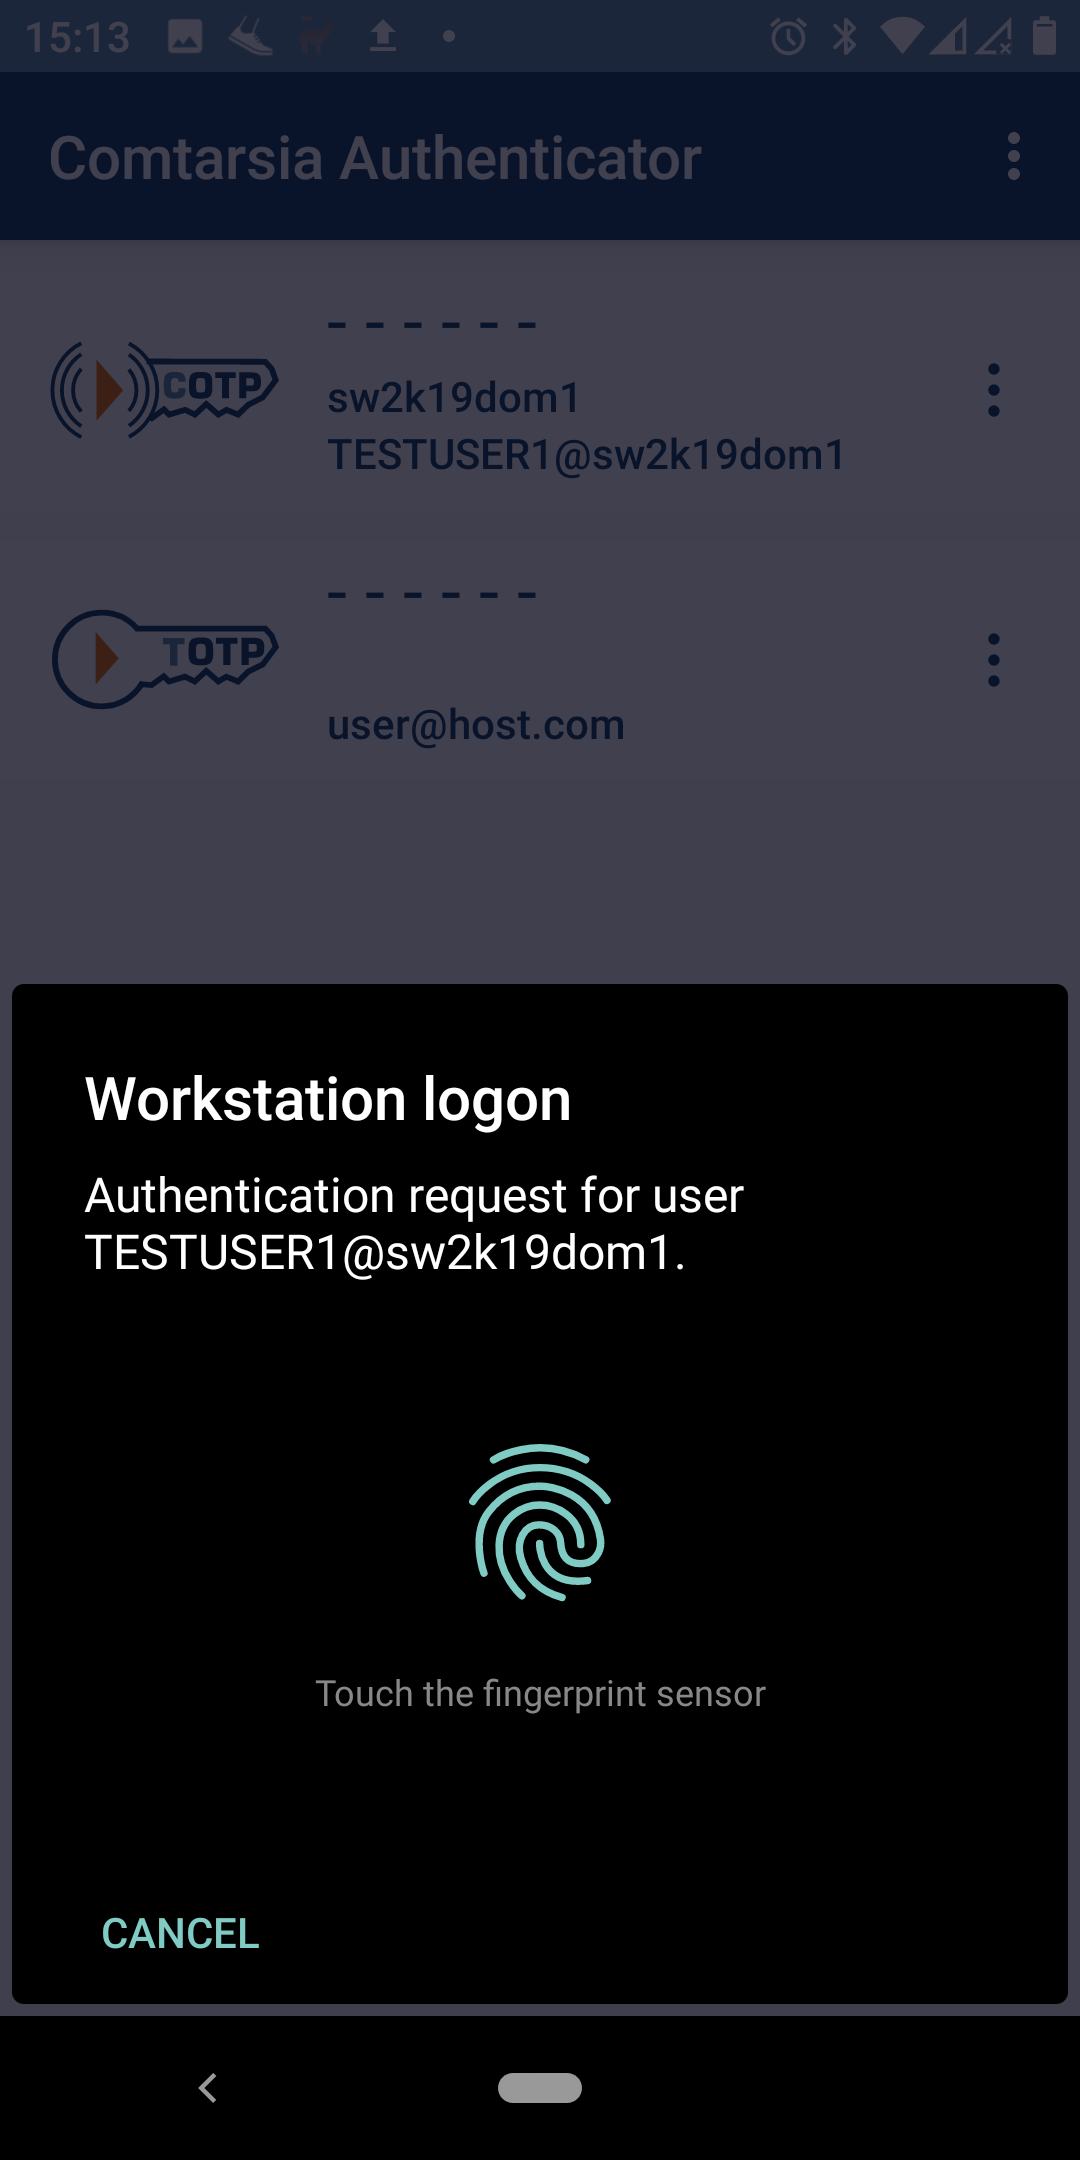
The user enters again his username and password and after submitting, a push notification is sent to the Comtarsia Authenticator running on the registered mobile phone. When opening this push message, the user is presented with a dialog that asks if he wants to proceed with the login, which he can confirm with his biometric (e.g. fingerprint). This information is sent back to the SignOn proxy and the user is logged in on the workstation.
9.2 FIDO2 for LDAP authentication
What is needed
- LDAP Directory
- Windows Server 2016 or Server 2019 where the SignOn Proxy will be installed.
- Client computer running Windows 10 which will host the Comtarsia Logon Client
- FIDO2 token (e.g Yubico Security Key, YubiKey 5, SoloKey, Authentrend AtKey Pro/Card)
SignOn Proxy configuration
After installing the SignOn Proxy on the Active Directory domain controller, open the Comtarsia Management Console.
Under “SOP” -> “General” set the “Authentication Mode” to “LDAP”.
On the “LDAP” -> “Server” tab, perform the necessary settings to connect to the LDAP directory. At minimum, the “LDAP host” and “Base DN” must be set.
On the “LDAP” -> “User” tab, set the “UserDN Prefix” to match the naming attribute of the user objects in the directory. Common values are cn= or uid=.
The “UserDN Mode” must be set to “Search for User as System User”. The “System User DN” and “System User Password” must refer to an account with sufficient rights. With this configuration, the SignOn Proxy will search for the user who wants to logon under the configured BaseDN.
Under “LDAP” -> “Groups” check that the used LDAP object class for the groups is selected under “Group Types”.
On the “Logon Policy” -> “Account Management” tab set the “Account Management Mode” to “Directory”. For “Account management attribute” and “Account management config attribute”, choose an attribute from the user respective the group object, that can be used by the SignOn Proxy to stored MFA information. Attention, already existing values in these attributes will be overwritten!
In the “MFA” group box, ensure that “Enable FIDO2” is checked.
Logon Client configuration
On the tab “Profile” set the authentication mode to “SignOn Proxy”. On the tab “Proxy” set the SignOn Proxy “Primary host” to the hostname or IP of the machine where the SignOn Proxy is installed. Under “Logon Policy” -> “MFA/OTP” check the option “Enable MFA/OTP interactive mode”.
User Management
For this example, a test user named “m71808” is created in the LDAP Directory. Additionally, a group named “group1” is created. Afterward, the User Management is started and on the group view, the group “group1” is double-clicked. This opens the management settings dialog for the group as seen in the screenshot below:
Enroll and Update are set to “Force immediately”, which means that the user has to enroll the FIDO2 on the next logon. MFA type is set to “FIDO2” and Resident Key is set to “no”, as this example only covers an online logon scenario. Click OK to save the settings and the user is ready to log in.
Enrolment
The user enters his username and password into the Logon Client login mask and submits them. The SignOn Proxy checks the credentials and then sends back enrolment data to the client, which will subsequently display the following message:
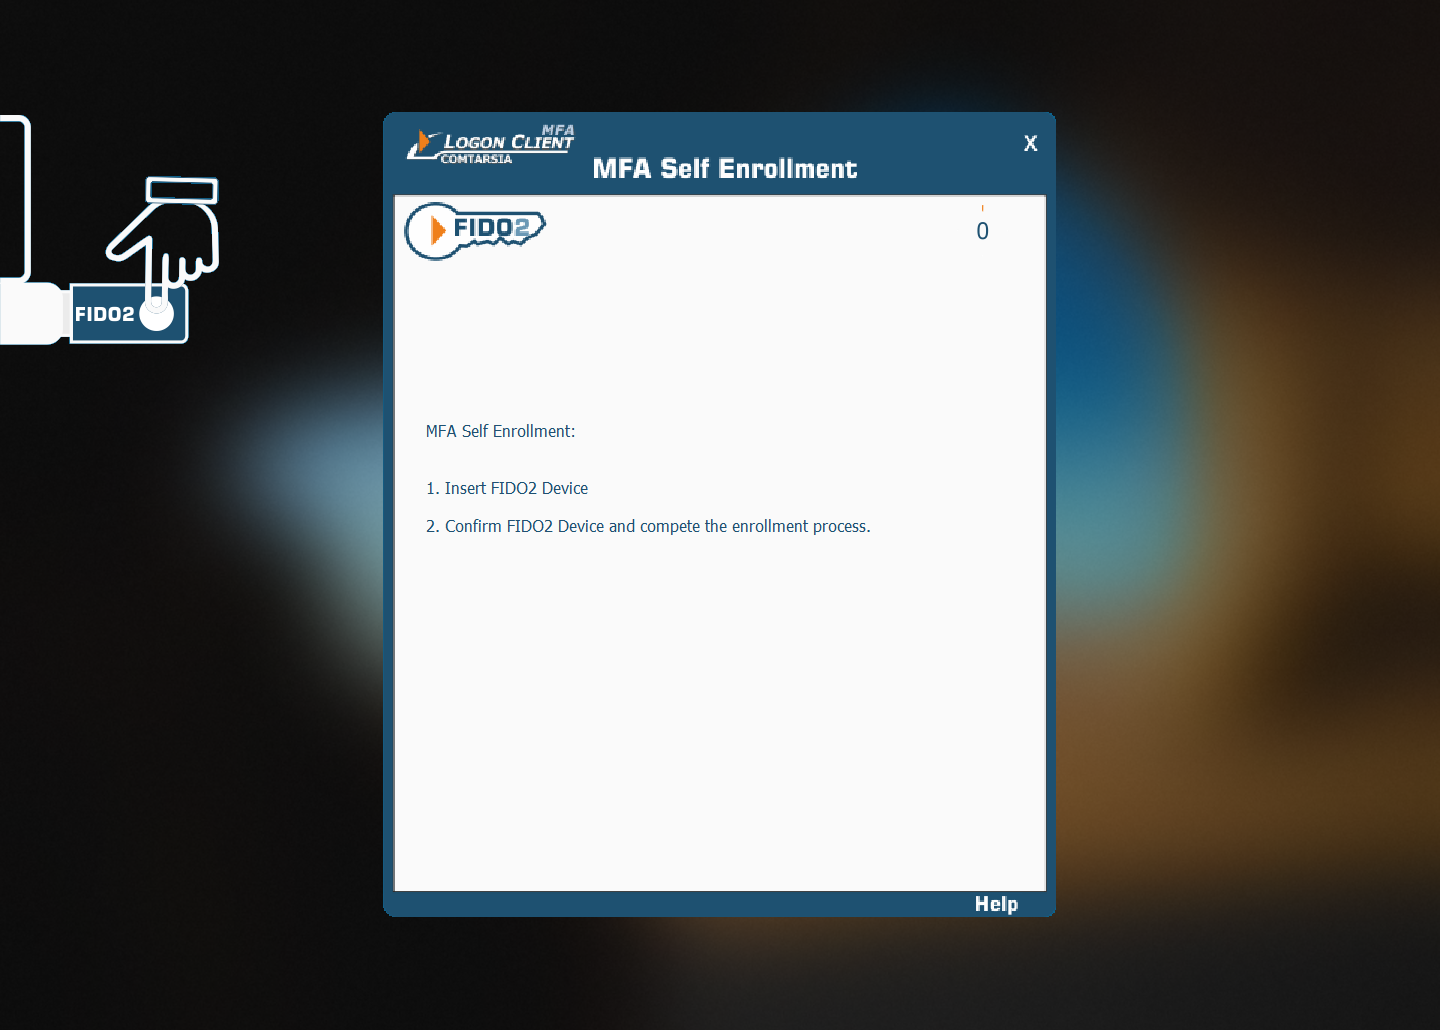
After clicking “Yes”, the Logon Client checks if a FIDO2 token is already connected. If no, the user is asked to connect a FIDO2 token. After the token is connected, it is checked if the token has already a PIN set. Creating a new credentials requires that a PIN is already set, and therefore, the user is asked to set a PIN if none exists yet:
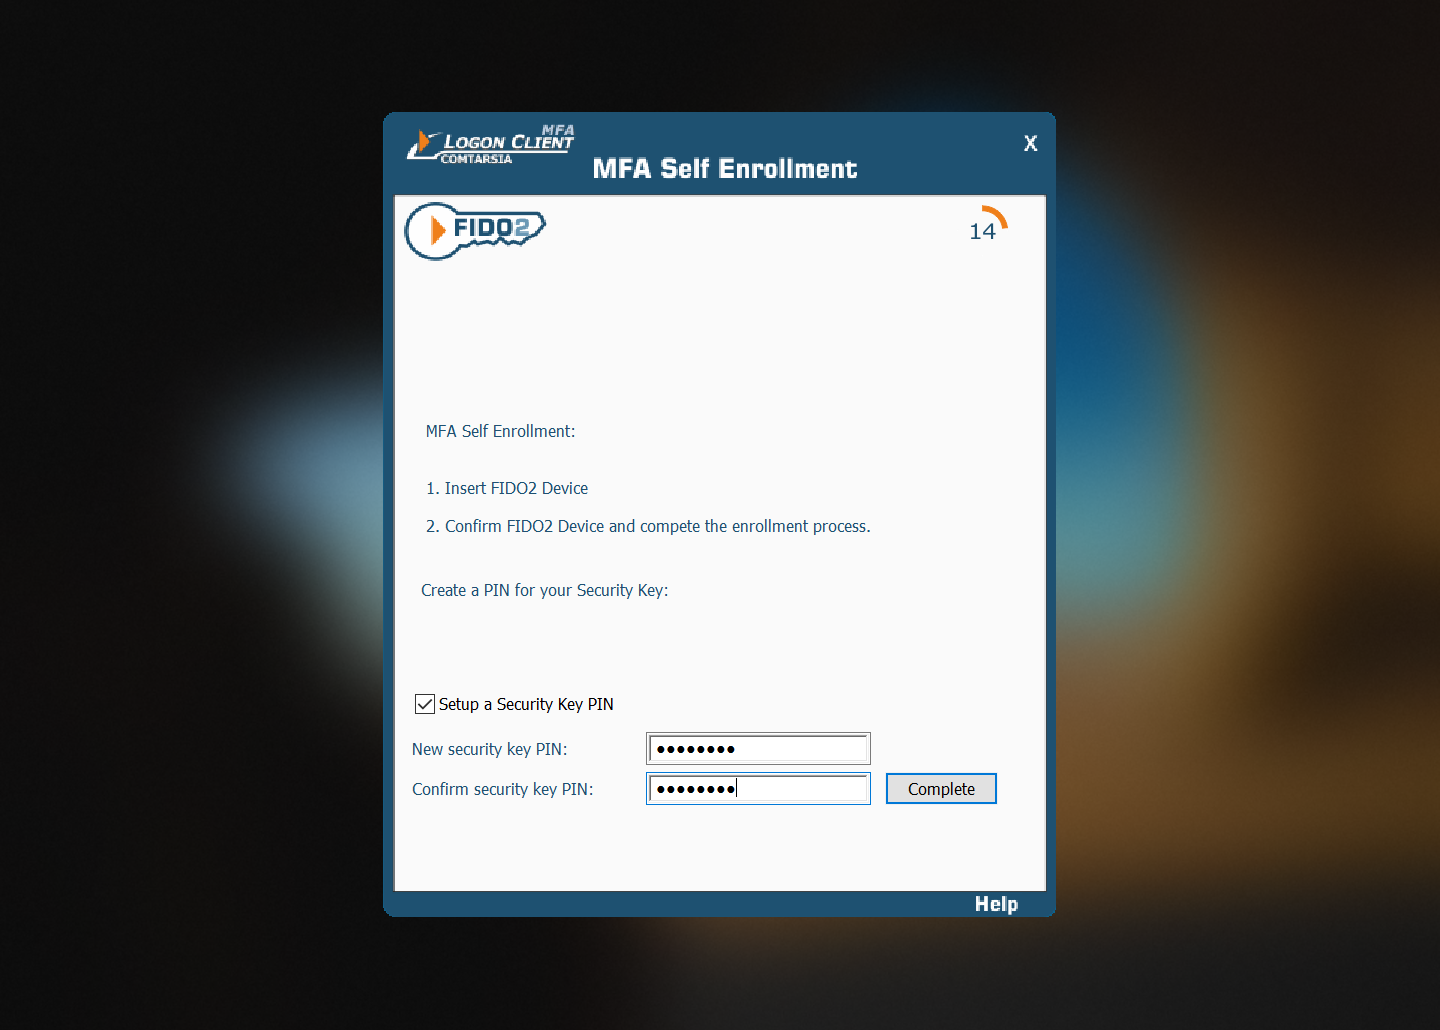
If a PIN is already set, the user needs to enter his PIN:

Afterwards, the token must be touched to create the new credential:
Now the enrolment is completed and the FIDO2 token must be used on subsequent logins.
First Login
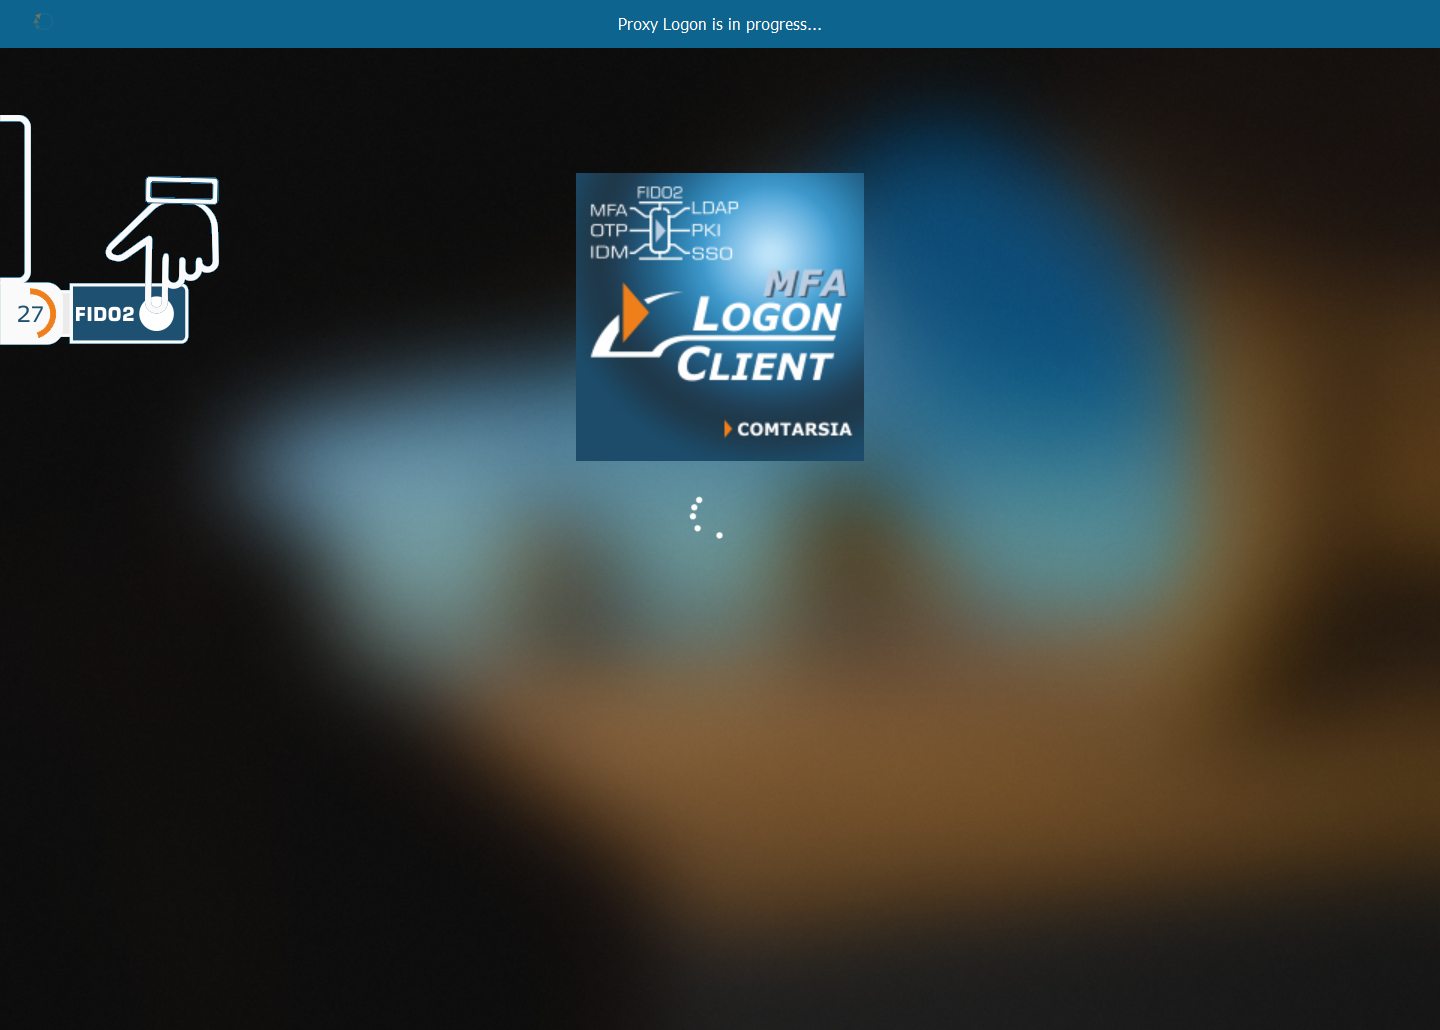
The user enters again his username and password and after submitting, a dialog gets displayed that asks the user to connect his token and press the buton to confirm the login:
10. Backup / Migration
The SignOn Proxy uses a unique ECC private key (MFAWebServiceKey) to communicate with Authenticator App. This key gets created automatically on the first connection to the Comtarsia cloud service if it does not exist. It is important to back up this key and keep it safe, as this key is necessary to decrypt messages from the Authenticator App. Comtarsia does not have this key, so we cannot help in case it got lost! If this key is lost. All Authenticator Apps that have credentials enrolled already, must re-enroll.
For FIDO2, the FIDO2RelyingPartyID must not change after clients have enrolled, otherwise, they have to re-enroll.
Best practice is to back up the whole registry tree under HKEY_LOCAL_MACHINE\SOFTWARE\Comtarsia\SOSProfile 501, which contains the complete configuration of the SignOn Proxy.
11. Troubleshooting
The Comtarsia SignOn Solution products contain multiple features that can help to troubleshot problems.
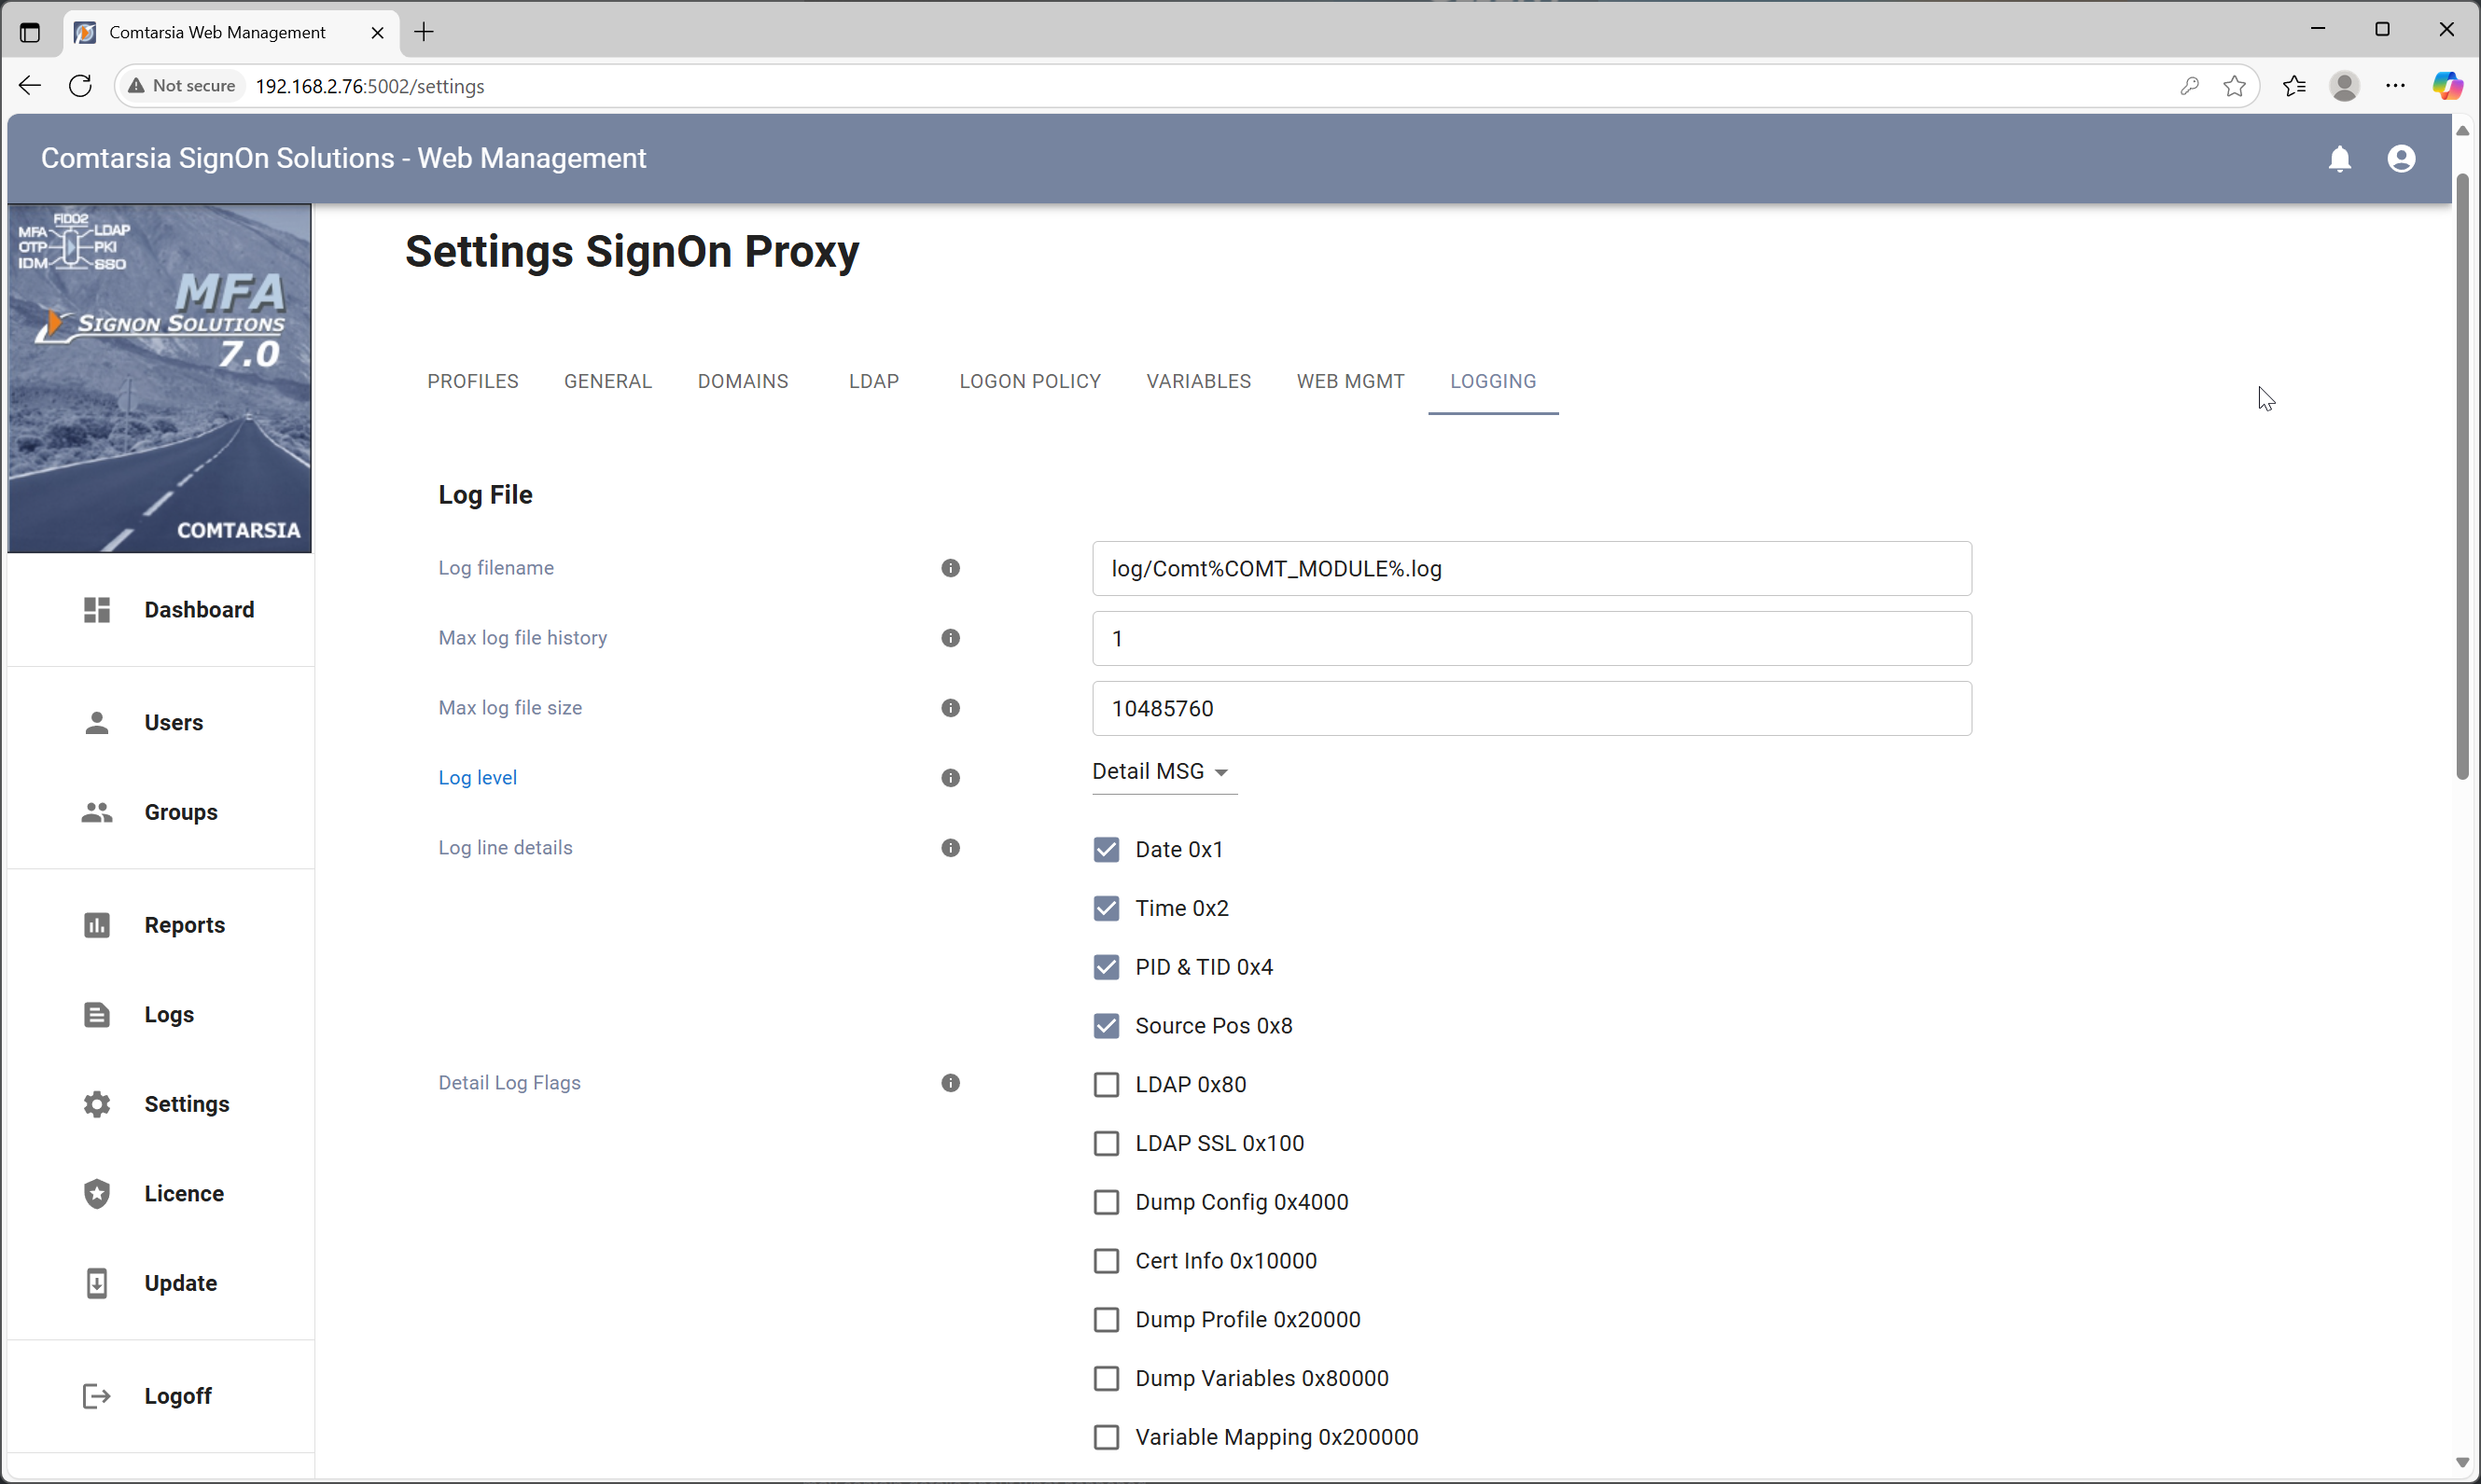
11.1 Logging
The Comtarsia Logon Client and the Comtarsia SignOn Proxy can write extensive information to the configured log file. This can be enabled in the Management Console under “Logging”. Set the Loglevel to “Detail MSG” as check Details Log Flags as that may be useful for the type of problem. Apply the settings and reproduce the problem. The log files will now contain detailed information about all the steps taken and about potential problems. These log files can also be forwarded to the Comtarsia support team if needed.
Most products allow logging to a file as well as logging to local syslog as well as remote syslog.
A screenshot of the SignOn Proxy log settings:
11.2 Web Management
The Web Management users view displays for every user that logged in at least once his last logon status and last logon date. In case of a logon failure, the logon status may contain details about what happened.
For COTP, detailed logs can be obtained from the Comtarsia Cloud Service by right-clicking a user and then selecting “Show Web Service Log”. A complete Cloud Service log is available from the Menu “Log” by selecting “Full Web Service Log”.